Category Archives: Breakfast/Brunch

Scottish Apricot Tea Bread

Scottish Apricot Tea Bread 2

A nod to our Scottish heritage with this traditional Scottish tea loaf. I used an orange cinnamon herbal tea and added chopped dried apricots and pecans.

The recipe includes an optional glaze. I don’t like my breads too sweet, so I usually leave it off, or serve it on the side for those who want the extra sweetness.

This bread is delicious served warm or cold and spread with cream cheese.

Scottish Apricot Tea Bread 3

RECIPE: Continue reading

2 Comments

Filed under Breads, Breakfast/Brunch

Zucchini Bread

Zucchini Bread

Zucchini bread is always the favorite option for an excess of garden squash in the summer.

Chocolate chips are optional. I prefer it without, but many in our family like a generous studding of chocolate chips in their zucchini bread.

Chocolate Chip Zucchini Bread

RECIPE:

Continue reading

Leave a comment

Filed under Breads, Breakfast/Brunch

Sausage & Green Chile Breakfast Casserole

Sausage & Green Chile Breakfast Casserole

A delicious breakfast casserole for those who like a little spice in their life.

RECIPE:

Continue reading

1 Comment

Filed under Breakfast/Brunch, Low Carb/Keto

Ham and Zucchini Quiche

Ham and Zucchini Quiche 2

Summer is in full swing, which means it is prime zucchini season. Pair this quiche with a salad for a perfect summer meal that can be eaten hot or cold.

For a perfectly browned crust, bake the quiche with a pie crust shield. It is easy to Make Your Own:

Pie Crust Shield

For a low carb version, just bake this quiche without a crust in an 8-inch square baking dish.

Ham and Zucchini Quiche 1

Some ideas for salads to serve alongside this quiche:

Chopped Caprese Salad
Greek Summer Salad
Chipotle Lime Quinoa and White Bean Salad
Thai Cucumber Salad

RECIPE:

Ham and Zucchini Quiche

Ham and Zucchini Quiche 2

Single pastry crust for 9” pie plate
1 ½ cups heavy cream
4 eggs
½ tsp salt
¼ tsp pepper
1/8 tsp ground cayenne or Ancho chile pepper
1 Tbs butter
½ cup finely chopped onion
1 cup chopped zucchini
1 cup chopped cooked ham
¼ cup fresh grated Parmesan
1 ½ cups shredded Swiss, cheddar, or  Gruyere cheese

Preheat oven to 425°F.  Prepare pastry crust and place in 9” pie plate (deep dish, if possible).

In a medium bowl, use a whisk to mix cream, eggs, salt, pepper, and cayenne pepper. Set aside.

Heat butter in a skillet. Add onion and cook for 2 minutes. Add diced zucchini and cook until crisp-tender (about 3 minutes). Place vegetables in a mixing bowl and stir in diced ham. Cool slightly. Stir in shredded cheese. Spread filling evenly into unbaked crust. Pour egg mixture over filling. Use a spatula or fork to remove any large air pockets.

If desired, cover the crust of the quiche with a pie crust shield. Bake at 425°F for 20 minutes. Reduce heat to 350°F and bake an additional 30 minutes, or until knife inserted in center comes out clean. Allow to set at room temperature 5-10 minutes before cutting and serving.

NoEmptyChairs.me

2 Comments

Filed under Breakfast/Brunch, Main Dishes, Side Dishes

Bacon Jalapeño Scones

Bacon Jalapeno Scones 4

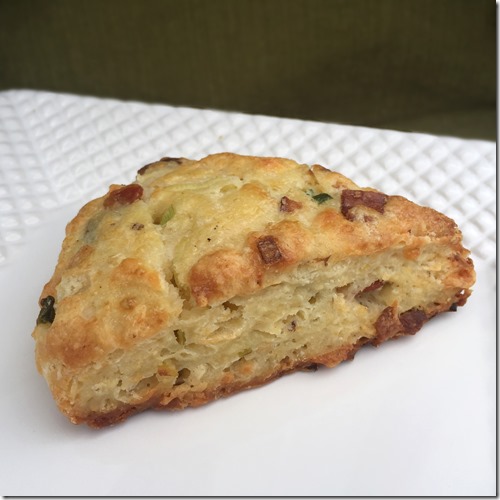
Scones don’t have to just be a dessert food. Scone dough is perfectly suited to add savory ingredients and served for breakfast or brunch. Or as an accompaniment to soup, stew, or chili for dinner. These scones are stuffed full of bacon, green onions, gruyere and Parmesan cheeses, and chopped jalapenos.

I only used one jalapeño this time, which was hardly noticeable. Next time I will use 2-3. Heat levels of jalapeños vary widely, however, so it is wise to taste a small piece before committing to adding 3 full jalapeños.

You can eat these plain, slathered with butter or Clotted Cream, or topped with jam. I served them with a homemade sweet & spicy Mango Jalapeño Jam.

Bacon Jalapeno Scones 5

To form the scones, transfer your dough to a well-floured surface and use your hands to shape dough into an 8” round disc about 3/4-inch thick.

Bacon Jalapeno Scones 1

Use a sharp knife to cut into 8 wedges. This recipe makes 16 scones. Don’t make one large circle and cut into 16 pieces. Instead, divide dough in half and make 8 from each round.

Bacon Jalapeno Scones 2

An important factor in getting light, airy scones is not working the dough more than necessary. An easy and effective way to cut your butter into the dry ingredients is to use a cheese grater to shred frozen butter into your dry ingredients and then mix only briefly. You want there to still be strands of visible butter. That is what will create the air pockets and layers in your scones.

Tip for adding butter: This recipe calls for 8 Tbs (1 stick) of butter. Freeze TWO  sticks, then take a pen and mark around the 4 Tbs line on each stick. (It is hard to grate slippery butter all the way down to the end of the stick without grating your fingers ) Fold back the paper on the sticks of butter to the line you’ve drawn.  Holding the paper-covered end of the butter, grate the butter directly into your dry ingredients (briefly stir occasionally so that you don’t have a big pile of butter in one spot). Stop grating when you get to the line where you’ve folded back your butter paper. I usually use the larger of the two grating hole sizes on the grater.

You can also grate butter that is just refrigerated, not frozen, but it will hold it’s consistency longer if you freeze it for about 30 minutes first.

Bacon Jalapeno Scones 3

RECIPE:

Bacon Jalapeño Scones

Bacon Jalapeno Scones 4

2 ½ cups flour
2 Tbs sugar
1 Tbs baking powder
1 tsp coarse kosher salt
½ cup unsalted butter (freeze TWO sticks for 30 mins for easier grating)
2/3 cup buttermilk
2 eggs, beaten lightly
½ cup chopped crisply-cooked bacon
¼ cup chopped green onion
2-3 jalapeños, seeded and finely chopped
2/3 cup grated Gruyere or Swiss cheese
¼ cup grated fresh Parmesan

Egg wash: 1 egg, beaten + 2 Tbs heavy cream

In a large bowl, whisk together the flour, sugar, baking powder, and salt.

Cut the butter into the flour mixture to form coarse crumbs. Tip for adding butter: Freeze TWO sticks of butter, then take a pen and mark around the 4 Tbs line on each stick. (It is hard to grate slippery butter all the way down to the end of the stick without grating your fingers ) Fold back the paper on the sticks of butter to the line you’ve drawn.  Holding the paper-covered end of the butter, grate the butter directly into your dry ingredients (briefly stir occasionally so that you don’t have a big pile of butter in one spot). Stop grating when you get to the line where you’ve folded back your butter paper. I usually use the larger of the two grating hole sizes on the grater.

Mix together the buttermilk and the beaten eggs. Make a well in the center of the  flour mixture and stir in milk just until moistened.

In a small bowl, stir together the cooked bacon, green onions, jalapeños, and grated cheeses. Mix gently into the scone dough.

On a floured surface, knead dough lightly until evenly mixed. Divide the dough in half. Pat each dough half into an 8-inch round about 3/4 inch thick. Cut each circle into 8 wedges.

Line baking sheets with parchment or silicone mats. Place dough wedges on prepared sheets and place in freezer for 30 minutes to chill.

Preheat oven to 400°F. Remove scones from freezer and brush lightly with egg wash. Bake for 16-18 minutes, or until golden brown. Cool on a wire rack.

Serve plain or with butter, Clotted Cream, or Mango Jalapeño Jam.

Yield: 16 scones

.

**TO FREEZE SCONES TO SERVE AT A LATER TIME:

Scones can be frozen either before or after baking.

To freeze before baking: Prepare scone dough. Cut scones and place on a baking sheet lined with foil or parchment paper. DO NOT brush with egg wash. Freeze until firm. Place into Ziploc bag or freezer container and store in freezer. Place frozen scones on a baking sheet lined with parchment paper or silicone mat. Let sit at room temperature for 30 minutes. Brush tops of scones with egg wash. Bake at 400°F for 18-20 minutes.

To freeze after baking: Prepare and bake scones. Cool completely and place on a baking sheet lined with foil or parchment paper. Freeze until firm. Place into Ziploc bag or freezer container and store in freezer. Place frozen scones on a baking sheet lined with parchment paper or silicone mat. Let sit at room temperature for 30 minutes. Bake at 300°F for 10-12 minutes.

NoEmptyChairs.me

2 Comments

Filed under Appetizers, Breads, Breakfast/Brunch

Clotted Cream (in an Instant Pot)

Clotted Cream 3

Clotted cream is a delicious British condiment. Perfect for topping scones, muffins, cornbread, bagels: anything that you might put butter, cream cheese, or whipped cream on. Or try a dollop on oatmeal with fresh fruit for a wonderful breakfast treat.

Clotted cream’s texture and taste lie somewhere between whipped cream and butter. So: the best of both worlds.

Vanilla Scones 3

Clotted cream is made by heating cream and keeping it at a low temperature while the fat solids separate from the thinner milk and whey. Maintaining a consistent low heat for a long time is the perfect job for an Instant Pot.

The hardest part of making clotted cream is finding heavy cream that is NOT ultra-pasteurized. Most grocery stores in the US do not carry cream that isn’t ultra-pasteurized. (You can use regular pasteurized cream, but not ultra-pasteurized. The cream will not clot the same.) I bought mine at a local farmer’s market. Some Whole Foods stores also carry it.

**Save the thinner milk/whey that is left after separation to use in other recipes where you would use milk.

Clotted Cream 2-2

RECIPE:

Clotted Cream (in an Instant Pot)

Clotted Cream 3

4 cups heavy cream, not ultra-pasteurized

1. Pour cream into the Instant Pot and close lid (use glass lid if you have one).
2. Set Instant Pot to Yogurt and then Boil (press the Yogurt button, then press Adjust until it says Boil).
3. When the Boil cycle finishes, use a thermometer to check that the cream has reached 180°F. Repeat step if cream has not reached 180°F.
4. Return lid (glass) to pot and press Keep Warm button. Leave at Keep Warm for 8 hours.
5. Turn off Instant Pot and set insert on a cooling rack. Cool to room temperature. Do not stir.
7. Cover with glass lid or plastic wrap and refrigerate for 8-12 hours. Do not stir.
8. Remove from fridge. The clotted cream will have thickened and risen above a layer of milk/whey.
9. Use a spoon to scoop out a small section of clotted cream from the side of the pot, and place in a bowl. Carefully pour off the milk/whey at the bottom of the pot (keep to use in other recipes that call for milk or whey). Scoop the remaining clotted cream out into bowl. Stir back in a little whey if you want a thinner texture.
10. Store clotted cream in the refrigerator or freezer. For a softer texture, remove clotted cream from refrigerator about 30 minutes before serving.

Yield: about 2 cups clotted cream

NoEmptyChairs.me

7 Comments

Filed under Appetizers, Breakfast/Brunch, Condiments/Sauces, Desserts, Instant Pot, Tips and Tutorials