Tag Archives: how to

Freezing Fresh Peaches (Without Peeling!)

Freezing Peaches 2

It is peach season here in northern Maryland. I have visited two orchards in the past week and I am making my way through a bushel of fresh-picked peaches. Some have made their way into jams, peach butter, frozen peach yogurt, and lots of fresh peach juice running down chins.

Even after all of this canning, I still have more peaches than we can eat our way through before they go bad. So the remaining peaches are going into the freezer to be pulled out all winter when we need a little reminder of summer.

2019-08-09 10.58.29

This is a super simple method for freezing peaches: no blanching, no peeling, no slicing. And I like them so much better than canned peaches.

All you need are two ingredients: fresh peaches and Fruit Fresh (a fruit preservative, mostly consisting of ascorbic acid).

Freezing Peaches 3

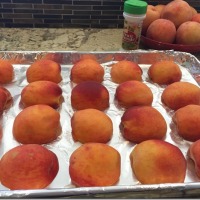
To prepare peaches for freezing: wash peaches, cut in half and remove pit, place cut side up on a foil-lined tray, sprinkle with Fruit Fresh, turn cut side down, and place in freezer. When peach halves are solid, place in Ziploc bags and return to the freezer.

Freezing Peaches 1

The kids’ favorite thing about these frozen peaches comes when you are ready to eat one. You can remove as few or as many peach halves as you want from the freezer. Place the peach half on a plate or in a bowl and microwave for about 20 seconds, or until no longer solid (You can also leave them in the fridge or at room temperature until thawed). To remove the peel, simply pinch the center of the peel and lift- the peel slides off in one perfect piece! So much easier than trying to peel the peaches before freezing!

Freezing Peaches 5

I enlisted a much cuter hand model to help with this demonstration.
Thanks Julia!

Freezing Peaches 6

Freezing Fresh Peaches

print=”true”]

Freezing Peaches 2

Ingredients:

Fresh ripe peaches
Fruit Fresh (fruit preservative)

Preparation:

  1. Wash peaches and cut in half.
  2. Remove pit, but do not peel peaches.
  3. Place peach halves cut side up on a foil-lined tray.
  4. Sprinkle cut side with Fruit Fresh.
  5. Turn peaches cut side down, and place tray in freezer.
  6. After peaches have frozen solid, place them in a Ziploc bag and return to freezer.
  7. When ready to use, microwave peaches for about 20 seconds and the skin will easily slide off.

NoEmptyChairs.me

Leave a comment

Filed under Canning/Freezing

How To . . . Make Your Own Pie Crust Shield

DSC05352-1

Getting ready to bake a ton of pies for Thanksgiving? Tired of burnt edges to your pie crusts, but don’t want to spend major $$ to buy commercial pie crust shields? Frustrated with trying to arrange foil strips and then nursing burnt fingers when the strips fall off in the oven?

Making your own pie crust shield is super easy, cheap, and will keep your fingers blister-free. And you won’t be tempted to curse in frustration at foil strips that just don’t stay put. Oh- and you will end up with perfectly browned pie crusts.

111010 073-1

To make you own pie crust shield you need the following: aluminum foil, scissors, pencil and the pie plate you will be baking in.

Set your pie plate, right side up, on a square of foil that is 2-3” larger than your pie plate.

060610 002-1

Trace the bottom of your pie plate (the smaller side).

060610 003-1

Set pie plate aside and cut out the inner circle.

060610 005-1

You can trim the corners on the outside edge, but I usually just leave them. Fill your pie crust, then set foil ring over the edge of the unbaked pie. Gently fold down outer edges, being careful not to squish all of that edge-crimping you worked so hard on!

111010 068-1

DSC05362-1

Bake pie, or quiche, with the pie shield on. Five minutes before the end of the cooking time, carefully remove shield. If the edges are not brown enough, leave shield off and bake until edges are golden brown. If the edges are browned, replace shield and continue cooking until quiche/pie is cooked through.

111010 073-1

DSC05383-1

Uses for Pie Crust Shield:

7 Comments

Filed under Breakfast/Brunch, Desserts, Tips and Tutorials

How to . . . Blind Bake a Piecrust

Blind Bake Crust 3

“Blind Baking” is a term for baking a pie crust with no filling. This pre-baked crust is used for any pie that is not cooked in the oven with its filling: pies with cream or custard fillings, ice-cream pies, lemon meringue pie, strawberry pie.

When you bake a pie crust without a filling, it tends to have bubbles form in the bottom part of the crust, or the sides sink and fall into the center of the crust. To keep this from happening, you need to bake the crust in two steps: first with something weighing down the bottom of the crust, and then without the weights to finish cooking the crust. Here is a quick How To… on blind baking a perfect crust.

Blind Bake Crust 4

Start with any crust recipe. Here is one that I like for an All Butter Pie Crust. Place in your pie plate and flute the edges. When you flute your edges, press down slightly on the indentations where the crust touches the top edge of the pan to keep it from sliding down the sides as it bakes.

Blind Bake Crust 3

Place a square of foil in the bottom of your crust. I like to use non-stick foil (non-stick side touching the crust) to keep it from sticking to the bottom of the crust. Extend the foil slightly up the sides of the crust, but do not cover the fluting on the edges. Add about 1-2 cups of DRIED beans to your foil bowl. You can also buy pie weights (either loose or on a chain), but beans are a great cheap alternative.

Bake the weighted crust at 400°F for 10 minutes.

Blind Bake Crust 2

Remove the beans and foil and prick the bottom of the crust with a fork.

Pie Crust Shield 1

Place a pie crust shield on the edges of your crust to keep them from overcooking while you bake the crust again. You can buy a pie crust shield or make your own. Here is an easy HOW TO on making one that is just the right size for your pie plate: Make Your Own Pie Crust Shield.

Blind Bake Crust 1

Bake empty crust for an additional 10 minutes, or until golden brown. Be sure to cool crust completely before filling.

Instructions:

How to Blind Bake a Piecrust

Blind Bake Crust 3

  • Prepare pie crust and place in pie plate. Flute edges, if desired.
  • Line bottom of pie crust with foil (I like non-stick foil), extending foil slightly up the sides of the crust. Add 1-2 cups dried beans, or use pie weights.
  • Bake at 400°F for 10 minutes.
  • Remove beans or weights and foil. Prick bottom of crust with a fork. Place a pie crust shield over the edges of the crust and bake for an additional 10 minutes, or until golden brown.
  • Cool completely before filling.

NoEmptyChairs.me

Leave a comment

Filed under Desserts, Tips and Tutorials

How To . . . Keep Cookies Fresh

1205112 024-1 Now that you’ve made all of those Christmas cookies, how do you keep them from going hard and dry before delivering them to all of your friends and neighbors?

Here are a few tips for keeping large quantities of cookies fresh:

  • Refrigerate or freeze uncooked dough. Uncooked dough can be kept in Ziploc bags or wrapped in plastic wrap (especially logs of dough) in the fridge. Take out dough and bake small batches of cookies. Many types of cookies actually taste better after letting the dough sit in the fridge overnight before cooking.  For drop cookies, freezing dough is very helpful. Prepare cookie dough and place scoops of dough on parchment lined baking sheets. Freeze raw dough until solid, then transfer dough balls to Ziploc bags. Pull out just as many cookies as you want to bake.
  • Refrigerate or freeze cooked cookies. Baked cookies will also stay fresh longer if stored in the refrigerator or freezer. Store cookies in Ziploc bags or seal-able containers and freeze or refrigerate until ready to serve. Be sure to keep different kinds of cookies in different containers. Mint and gingerbread cookies do not go well together!
  • To store cookies at room temperature: You can still keep cookies fresh without freezing all of them. Use containers that are as air-tight as you can find. Place a small piece of BREAD in the container with the cookies. The bread will lose its moisture more quickly than the cookies, allowing the cookies to stay soft longer than they normally would. Replace the bread with a fresh piece as it dries out. This will not keep cookies soft indefinitely, but it will extend their shelf life to more than a week.

1205112 023-1

Just a note of warning: if you put bread in your cookie jar, every time your kids open the jar, they will ask, “How come there’s bread in the cookies?”  Some may even choose to eat the bread over the cookies, which will prompt you to ask (when you go to sneak another cookie for yourself get a cookie for a starving child), “What happened to the bread I put in the cookie jar?” No one, of course, will admit to eating the mysteriously disappeared stale bread.

1205112 027-1

P.S. This also works to keep your brown sugar soft. The bread will last much longer in your canister of brown sugar than in the cookie containers. Maybe because it doesn’t get opened quite as many times throughout the day!

7 Comments

Filed under Cookies, Tips and Tutorials

How To . . . Make Great Waffles

buttermilk waffles sep eggs (18)-1

BWnoegg-1 (7)

Basic Waffle Tips & Strategies

BWnoegg-1 (7)

  • Make sure that your waffle iron is very hot. Cool iron = lots of sticking. My new Calphalon waffle iron is non-stick and does not require any oil or spray to keep the waffles from sticking.
  • Don’t overfill the waffle maker pockets. Spillage is not fun to clean. Start with a scant amount of batter on the first few waffles, until you are sure of the right amount. Different recipes will rise more or less while cooking, so don’t think that the same amount of batter will work with different recipes.
  • Once your batter is mixed, do not keep stirring batter between batches. The air pockets in the batter (from the baking powder/soda or whipped egg whites) will collapse with over-stirring.
  • Use a ladle or measuring cup (1/2 cup size works well for my waffle maker) to scoop batter. This minimizes the stirring or pouring which will deflate your batter.
  • If you are using add-ins like blueberries or chocolate chips, sprinkle them on the batter in the waffle iron (instead of in the batter in the bowl); then use a heat-safe rubber spatula (or the back of your ladle) to move some batter over the berries/chips so that they don’t stick to the top plate of the waffle maker. If stirred into the batter in the bowl, these heavier items tend to sink, requiring more stirring, which will deflate your batter.
  • Cool waffles on a wire cookie sheet, not a plate. Letting the air circulate around the waffles will keep them from getting soggy.
  • If you are not serving the waffles immediately, place the wire cooling rack in a warm oven (200°F or lower) until ready to serve.
  • Waffles are great for making in large batches and freezing in Ziploc bags for busy mornings. Reheat in the toaster to maintain crispy edges.
  • Buttermilk substitute: Place 1 Tbs lemon juice in a one cup measure; add milk to one cup line. Stir; let sit for 5-10 minutes before using. Or try dried buttermilk powder that stores in the fridge. Or use kefir.
  • Oil (in the batter) makes for crispier waffles; melted butter makes for softer, more cake-like waffles. I prefer using oil in most recipes. Use a mild flavored oil.

NoEmptyChairs.me

Waffle Recipes:

Leave a comment

Filed under Breads, Breakfast/Brunch, Desserts, Tips and Tutorials