Tag Archives: Valentines day

Cookies by Julias: Valentine Shortbread Cookies

2017-01-27 14.42.44

2 Julias + 1 day off of  school = Tons of cookie fun

2017-01-27 14.16.31

These 2 cute girls wanted to bake cookies on their day off of school, and since one of them is allergic to eggs, they decided to make shortbread cookies. But traditional rectangles were way too boring, so they went with hearts. And chocolate. Lots and lots of chocolate.

2017-01-27 14.12.39

And once the chocolate melting and dipping started, their creative juices really got flowing!

2017-01-27 14.43.28

2017-01-27 14.42.44
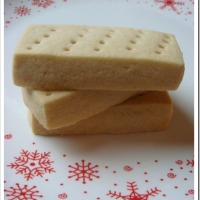
If you are looking for more traditional shortbread cookies, you can always go with plain-old-boring-rectangles:

shortbread-1

RECIPE:

Valentine Shortbread Cookies

2017-01-27 14.43.28

2 cups butter, softened
1 cup brown sugar
1 Tbs vanilla extract
½ tsp salt
4 ½ cups flour
Dark chocolate and/or colored candy melts

Preheat oven to 325°F.

Make sure that butter is very soft, but not melted. Cream butter and brown sugar with a mixer for 2 minutes. Beat in vanilla and salt. Gradually add flour, mixing well.

Lightly sprinkle flour on a pastry board or mat. Gently press or roll dough until dough is about 1/3” thick (dough will be softer than a normal cut-out cookie dough). Use a heart cookie cutter to cut out shapes and use a thin metal spatula to transfer hearts to ungreased cookie sheets, leaving a small space between cookies.

Bake at 325°F for  about 20 minutes. Do not brown. Cool on a wire rack.

In a small microwave safe bowl, melt about 1 cup chopped chocolate in microwave by cooking in 30 second increments, stirring after each heating, until completely melted. Dip cookies as desired. To drizzle chocolate, place chocolate or candy melts in a Ziploc bag and cook for 30 seconds in microwave. Squish bag and repeat as needed until melted. Use a toothpick or skewer to poke a small hole in one corner of the bag and drizzle melted chocolate over cookies.

Place cookies on parchment paper or wax paper to harden. You can chill them in the refrigerator, if desired, to speed up the setting of the chocolate. Higher quality dark chocolate will take longer to harden than the candy melts.

Makes 2 ½ – 3  dozen cookies, depending on the size of your cookie cutter.

NoEmptyChairs.me

Leave a comment

Filed under Cookies, Desserts

Stained Glass Valentine Cookies

Stained Glass Valentine Cookies 1

Here is a fun Valentine treat to make with kids and is easier than your traditional frosted sugar cookies. All you need is a good sugar cookie recipe, a package of Jolly Rancher hard candies and two different sized heart cookie cutters.

To begin, you will need to line your baking sheets with silicon mats or parchment paper. Non-stick foil might work as well, but I haven’t tried that yet.

Prepare your dough and cut out large hearts. I usually like to make nice thick sugar cookies, but these need to be about 1/8” thick, or the center “window” will be too thin compared to the cookie. Place cookies on baking sheet and then cut out the smaller heart in the center of each cookie. Cutting out the smaller heart after the cookie is on the baking sheet helps the cookie dough retain its shape. It is harder to move cookie dough with the center cut out. You can bake the little hearts along with the big ones, or reroll them with your dough scraps.

Place one Jolly Rancher candy (whole) in the center of each cookie. If your openings are smaller than the candies, you can crush the candies first, but I found that there are fewer bubbles in your windows if you leave the candies whole. And it is so much easier than crushing hard candy!

Stained Glass Valentine Cookies 3

While the cookies bake, the candies will melt and fill in the centers.

After baking, let the cookies completely cool and the candy window centers harden before removing from baking sheet.

Store covered between layers of waxed paper or parchment paper. The candy centers will stick together if they touch.

Stained Glass Valentine Cookies 2

You could also make these into cookie pops by inserting lollypop sticks into the bottoms of each heart before baking.

It would also be fun to make some for other holidays using different cookie cutters, or a linzer cookie cutter (crush candies first if using a small linzer cutter). Or a gingerbread man with a tiny cut-out heart.

RECIPE:

Stained Glass Valentine Cookies

Stained Glass Valentine Cookies 1

3 cups sugar
1 cup butter, softened
1 cup sour cream
2 tsp vanilla
3 eggs
1 tsp baking soda
1 tsp salt
About 7 – 7 ½ cups flour
1 package Jolly Rancher candies
2 heart cookie cutters (one large and one small)

In a large mixing bowl, beat sugar, butter, sour cream and vanilla until light and fluffy. Beat in eggs.  Mix in baking soda, salt and enough flour to make a moderately stiff dough (Start with 7 cups and add more if needed).

Chill for 20 minutes to 1 hour, if necessary, for easier handling. Roll out dough to about 1/8” and cut with large heart cookie cutter. Cut out a smaller heart inside of each cookie. You can bake these plain smaller hearts, or re-roll them with the dough scraps.

Place hearts on a baking sheet lined with a silicon baking mat or parchment paper. Place one whole Jolly Rancher candy in the center of each heart.

Bake at 375°F for 9 -10 minutes, or until candies have melted; cookies should not be browned on the edges.  They should look white when done. Cool completely on the baking sheet. When candy centers are completely cool and hardened, remove cookies to a sheet of parchment paper.

Store covered between layers of waxed paper or parchment paper. The candy centers will stick together if they touch.

Makes 5-6 dozen, depending on the size of the cookie cutter

NoEmptyChairs.me

14 Comments

Filed under Cookies, Desserts

Turning Teen and Three Chocolate & Peanut Butter Creations

DSC06459-1 Last week was my Middle K’s 13th birthday! While she is technically the “middle child”, she is in the unique position to play, as it suits her, the role of oldest, middle or youngest child.

In terms of birth order, you can’t get much more middle than our Middle K. The third of five children, with both a younger and older brother, and a younger and older sister.  But as there is a five-year age gap between Middle K and Little A, she spent a fair amount of time as the “baby” of the family. This age gap often divides our family when it comes to activities: the “big kids” and the “little kids” (think amusement parks here).  So in these settings, she fills that youngest child role. But at home, she has really stepped into the “oldest child” role with respect to the little ones. She is the one they come to when they want to play, and she is often the one to help them and put them to bed when Brian and I are out.

I guess it is in her adaptability that her strength as a middle child really shines. What a blessing to our family.

052210 030-1

If only she would look at a camera willingly!

Middle K loves to cook, as long as it is something sweet, and she has been on a real chocolate and peanut butter kick lately. Here are some of her most recent endeavors:

Peanutty Buckeye Bars

FEB 6, 2010 187-1

Peanut Butter Heart Kisses

0401010 047-1

These Hershey’s Bliss chocolates make a great alternative to traditional Kisses.

0401010 037-1

Some of the peanut butter cookies were left “heartless”, for our chocolate-adverse Little A.

0401010 027-1

Chocolate Peanut Butter Buckeyes

052210 034-1 (Traditional Buckeyes will have some of the peanut butter middle showing at the top like an “eye”, but Middle K was in this for speed and volume, not appearance)

RECIPES:

Peanutty Buckeye Bars

FEB 6, 2010 187-1

1 (19.5-oz) package brownie mix
2 eggs
1/3 cup oil
1 cup chopped peanuts
1 14-oz can sweetened condensed milk
½ cup creamy peanut butter

Preheat oven to 350°F. Lightly grease a 9×13” baking pan.

In a large bowl, combine the brownie mix, eggs, and oil. Beat with an electric mixer on medium speed until combined. Stir in peanuts.

Remove about one-third of the brownie batter and set aside. Spread the remaining two-thirds of the brownie batter evenly into prepared pan.

In a medium bowl, whisk together sweetened condensed milk and peanut butter until smooth. Spread evenly over brownie mixture in pan. Separate the remaining brownie mixture into pieces, flatten them with your fingers (you want them to be pretty thin), and lay them on top of the peanut butter layer. Do not completely cover the peanut butter layer.

Bake for 25 to 30 minutes or until top is set and edges are lightly browned. Cool completely in pan on a wire rack. Cut into bars.

Makes 18-24 bars.

From Better Homes and Gardens

NoEmptyChairs.me

Peanut Butter Heart Kisses

0401010 047-1

½ cup butter
½ cup coconut oil or additional butter
1 cup creamy peanut butter
1 cup sugar
1 cup brown sugar
2 eggs
1 tsp vanilla
3 cups flour
1 ½ tsp baking soda
1 tsp baking powder
Hershey’s Bliss Chocolate Hearts (or Dove Hearts or other “shaped” chocolate)

Preheat oven to 350°F.

Cream butter, coconut oil (if using), peanut butter and sugars. Beat in vanilla and eggs. Add dry ingredients. Roll dough into  balls. Place on an ungreased cookie sheet.

Bake at 350°F for 8-10 minutes. Immediately press 1 chocolate heart into each cookie; cool on a wire rack.

NoEmptyChairs.me

Chocolate Peanut Butter Buckeyes

052210 034-1

1 ½ cups creamy peanut butter
½ cup butter, softened
1 tsp vanilla extract
4 cups powdered sugar, sifted
2 cups chocolate chips (semi-sweet or bittersweet)
2 Tbs shortening

In a large bowl, mix peanut butter, butter, vanilla, and powdered sugar. (This will be a stiff dough; hands work best for mixing)

Shape dough into balls. (If the dough is too sticky to work with, refrigerate for about 20 minutes before rolling into balls) Place on a waxed paper lined baking sheet or cutting board. Refrigerate for about 30 minutes.

Using a double boiler, melt chocolate and shortening. Alternately, melt chocolate and shortening in the microwave (for 30 seconds at a time, stirring after each time).

Use a toothpick to dip balls into warm, melted chocolate. Leave an “eye” shape at the top by not completely dipping peanut butter ball. Return coated balls to the waxed paper lined pan.

Refrigerate to set.

Makes 3-4 dozen

NoEmptyChairs.me

1 Comment

Filed under Cookies, Desserts, Uncategorized

Dulce de Leche Mini Cheesecakes

DSC04531-3

What says “I Love You” more than cheesecake, dulce de leche, chocolate and whipped cream all in one hand-held mini dessert? In my book, dessert doesn’t get much better that this. And these pocket-sized cups of bliss are small enough that it is easy for me to justify that I’m not really cheating on that healthy-eating-plan, right?

Unless of course, you make THIS MANY, which destroys any illusion of willpower:

DSC04528-1

This recipe is a loose interpretation of Smitten Kitchen’s Dulce De Leche Cheesecake Squares.

The impetus for trying this recipe came when I found these great free-standing baking cups (technically they are for brioche) from Plastic Container City. I knew that I wanted to make cheesecakes in them, and what better than a dulce de leche flavored cheesecake!

DSC04275-1

Rather than a graham cracker crust, I used my favorite cheesecake crust which is a simple combination of finely chopped almonds, vanilla wafer cookies and butter.

DSC04286-1 Place your crust-lined baking cups on a large baking sheet (or use a muffin tin with foil baking cups) and bake for 5 minutes, to toast the almonds.

Cool and pour in the batter. This cheesecake batter is a most delicious combination of cream cheese and dulce de leche, which you can easily make yourself, or purchase premade (look in the Latin section of the ethnic food aisle in the grocery store). But it is really easy to make yourself with just a can of sweetened condensed milk. Check out these tutorials for 6 different ways to make your own Dulce de Leche.

DSC04297-1

Bake until center is barely set and allow to cool completely.

DSC04307-1

I drizzled a chocolate glaze over the cooled cheesecakes.

DSC04513-1 Not wanting to clean chocolate out of my pastry bag, I used a plastic zip-close bag to do the drizzling. (Either snip one corner of the bag, or poke a bamboo skewer through the inside corner of the bag before filling with chocolate). I do recommend using a quality brand freezer-bag, however, so that the bag will not burst at the seams when you squeeze it, leaving you with one VERY chocolatey cheesecake:

DSC04499-1After cleaning up my chocolate mess and making an additional batch of chocolate glaze:

I then topped each cheesecake with a swirl of whipped cream. The whipped cream is a stable whipped cream from Coleen’s Recipes. It will hold it’s shape for days in the refrigerator and is stiff enough to pipe with a pastry tip (this time I did use my pastry bag). I would have liked to have used a larger tip, but I don’t own one (yet!). The cream cheese in the whipped cream topping was a perfect complement to the cheesecake. Coleen’s blog has some great family friendly recipes, and I have gotten many practical tips from her!

DSC04528-1 A final drizzle with the chocolate glaze and they are ready for a few hours of chilling in the fridge-if you can wait that long!

DSC04531-1

RECIPE:

Dulce de Leche Mini Cheesecakes

DSC04531-3

INGREDIENTS:
Crust:

½ cup crushed vanilla wafers or shortbread cookies**
½ cup finely chopped whole almonds**
2 Tbs melted butter
1/8 tsp salt

Filling:
1 tsp unflavored gelatin (about half an envelope of Knox brand)
¼ cup whole milk
8 oz cream cheese, softened
2 large eggs
½ tsp salt
1 cup dulce de leche

Glaze:
¼ cup (heaping) chopped bittersweet chocolate
2 Tbs butter, cut into small pieces
1 Tbs light corn syrup

Whipped Cream Topping (from Coleen’s Recipes):
4 oz cream cheese
¼ cup sugar
½ tsp vanilla
¼ tsp almond extract
1 cup heavy cream

PREPARATION:
Crust:
Preheat oven to 350°F.

Mix all crust ingredients. Press into baking cups (use 1-2 tsp crust mix per mini cheesecake). Place baking cups on a large baking sheet. Bake at 350°F for 5 minutes. Cool.

**I use a food processor to chop the cookies and almonds

Filling:
Sprinkle gelatin over milk in a small bowl and let stand 2 minutes to soften. Beat together cream cheese, eggs, salt, and gelatin mixture in a bowl with an electric mixer at medium speed until well combined, about 2 minutes, then beat in dulce de leche  thoroughly. Pour filling over crust in baking cups.

Place an empty broiler or roasting pan on the lowest oven rack. Pour 2 cups of boiling water into the empty pan.

Place baking sheet with cheesecake batter on the center rack in the oven. Bake at 350°F for 15 minutes, or until center is barely set. Remove from oven and cool completely.

Glaze:
Place all ingredients in a microwave safe bowl. Cook on high power for 20 seconds. Remove and stir well. Add 10 seconds, if necessary. Be careful not to scorch. You can also use a double boiler to melt ingredients together.

Place melted (but not hot) chocolate glaze into a freezer bag (good quality, so it doesn’t burst) or pastry bag with a fine tip. If using a freezer bag, cut a corner (or poke a bamboo skewer through the corner). Pipe a swirl of chocolate glaze over cooled cheesecakes.

Set aside remaining glaze. Prepare whipped cream topping. Pipe an additional swirl of chocolate glaze over the whipped cream.

Whipped Cream:
Combine the cream cheese, sugar and extracts in a large mixing bowl. Beat with an electric mixer until very smooth (scraping sides often). While the mixer is running, slowly pour in heavy cream. Continue beating on high speed until stiff peaks form.

Place whipped cream mixture in a pastry bag with a large star tip. Pipe onto cheesecakes. Pipe an additional swirl of chocolate glaze over the whipped cream.

Chill cheesecakes in the refrigerator for 2-3 hours. They will keep, refrigerated (even with the whipped cream frosting!) for several days.

Adapted from Smitten Kitchen

NoEmptyChairs.me

4 Comments

Filed under Desserts