Monthly Archives: October 2011

Canning Apple Pie Filling

103011 031-1

As part of a church young women’s project this fall, I have been teaching MiddleK how to can. We started with Applesauce, then promptly proceeded to eat almost all of it over that next week, which kind of defeated the “storage” role of canning. But it had been a long time since we’d had homemade applesauce around here, and I was glad to see the kids asking for that for a snack instead of chips or candy. So we bought A LOT more apples, and made LOTS more applesauce. With all of our apples we also made this Apple Pie Filling.

103011 017-1

Middle K also wanted to learn to make her own piecrust for her pie filling, and while the family waited for her to finally make a pie, we ate the pie filling stirred into yogurt, as an ice cream topping, or when no one was looking: straight from the jar.

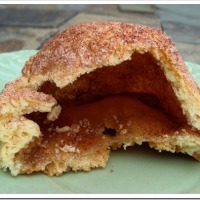
Yesterday, Middle K, under extreme pressure from her siblings, found the time to create this beautiful apple pie. She made the crust all on her own, and she did a fabulous job!

103011 051

This canned apple pie filling is chock full of apples in a cinnamon brown sugar syrup. When choosing apples for pie, you want to choose a variety that does not get mushy when cooked, and is not overly tart, or you will need to add a lot more sugar to the syrup. We really like eating Granny Smith apples around here, but I don’t usually use them for pies, unless it is in combination with some sweeter varieties. I also like to use a combination of apple varieties, when possible. Then the different textures of the apples makes a nice balance in the pie. For this pie filling we used a combination of Golden Delicious and Fuji apples.

Good Apples for Canning:
Golden Delicious
Fuji
McIntosh
Jonagold
Rome
Jonathon
Cameo
Gala (but only in combination with another variety: they get kind of soft when cooked)

Not-So-Good Apples for Canning:
Red Delicious
Cortland
Gala (on their own)
Granny Smith (too tart on their own; texture is good, but they will require more sugar; good when combined with sweeter varieties)

103011 061-1

When making the apple pie filling, you can thinly slice or dice the apples. I like to dice them because they fit better in the jars and are a nice size for biting in a pie. The chopped apples are mixed with apple cider, sugar and spices, and left to macerate for an hour or more before cooking. This helps release some of the juice from the apples and helps meld the flavors. We kept the spices simple in our batches this year: just cinnamon and a little bit of nutmeg. For a more heavily spiced pie filling, you can add cloves, ginger and/or allspice.

The one special ingredient that you need for making canned pie fillings is Clear Jel. Clear Jel is a modified corn starch made specifically for canning. It is a thickener that will not loose it’s texture or become grainy after being cooked more than once (first while preparing the filling and processing the jars and then again when you cook the pie). I buy mine from a company called Walton Feed. I like that I can get sealed cans. Clear Jel is also available in bags from Amazon.

One problem that we did run into on a couple of our jars was “siphoning”. This is when some liquid from inside the jars seeps out while processing, or immediately after being removed from the canner. The filling is still safe to eat as long as the lid seals, but it does make for kind of a sticky mess and an increased likelihood that the jars won’t seal properly. We left 1” headspace on the jars before processing, but next time I will leave 1 ¼”. After doing some reading, another way to reduce siphoning is to leave the jars in the boiling water bath (with the heat turned off and the lid removed) for about 10 minutes after fully processing them. I will try this next time around. Supposedly, the drastic temperature change from the boiling water to the outside air can often cause siphoning. Pie filling is the only thing I have ever had this problem with. Luckily, all of our jars sealed, but I did mark the ones that had the siphoning problem so that we could eat those jars first.

When making a pie from canned filling, you simply prepare your bottom crust, pour in the filling, add a top crust or streusel topping and bake (for about 45 minutes at 400°F). A regular 8”or 9” pie plate will use one quart jar. For deep dish pie plates (which I have), I use one quart jar and one pint jar. So I can both quart and pint sized jars. You could also just use 1 ½ quart jars and use the other half jar as ice cream topping.

RECIPE:

Apple Pie Filling (for canning)

  • Servings: Makes about 3 ½ quarts
  • Print

103011 017-1

6 lb apples** (about 16-18 apples, or 12 cups sliced/diced apples)
3 cups apple cider
1 cup dark brown sugar (or light brown sugar plus 1 tsp molasses)
½ cup sugar
½ cup lemon juice
2 tsp vanilla extract (or one vanilla bean, scraped)
½ tsp salt
2 tsp ground cinnamon
scant ½ tsp ground nutmeg
(OPTIONAL: 1/8 tsp each: cloves, ginger & allspice)
1 cup apple cider
1/3 cup Clear Jel

In a very large bowl, mix together 3 cups apple cider, sugars, lemon juice, vanilla, salt, cinnamon, nutmeg, and optional spices (if using).

Peel, core and coarsely chop or slice apples. Place apples in cider mixture as you cut them. Allow apples to sit at room temperature for at least 1-3 hours, stirring occasionally.

Strain juice from apple slices into a large pot. Bring to a boil over medium-high heat. Reduce heat to low and simmer for 5 minutes.

In a small bowl, mix additional 1 cup of apple cider with the Clear Jel; stir into the cider mixture simmering in the pot. Return to a boil and cook until the juice has thickened, about 1 – 2 minutes. Stir in apple pieces with any remaining juice in the bowl. Return mixture to a boil, lower heat and simmer for 5 minutes.

Ladle hot pie filling into hot jars, leaving 1 ¼” headspace. Use a spatula or knife to remove air bubbles. Make sure that your apples are covered by the syrup. Wipe rims with a clean, damp cloth, place lid and ring on the jars, and process in a boiling water bath for 25 minutes for quart or pint jars. After processing, turn off heat and remove the lid from the canner, but allow the jars to sit in the water for 10 minutes before removing. This will help reduce siphoning (liquid seeping out of the jars). Remove jars from water and place on a clean, dry towel on the kitchen counter. Let sit for 24 hours. Check seal, remove rings and store.

**For best results use a mix of Golden Delicious, Fuji, McIntosh, Jonagold, Rome, Jonathon, Cameo or Gala.

Yield: about 3 ½ quarts

Recipe adapted from LocalKitchen

USING YOUR CANNED APPLE PIE FILLING:

Canned pie filling can be used to make apple pies, tarts, or apple crisp. Or spoon it onto ice cream or yogurt.

To make a regular 8-9” pie: use one quart of pie filling

To make a deep dish 9” pie: use one quart + 1 pint of pie filling (I can both quart and pint jars to make this easy. Or just use 1 1/2 quart jars and eat the other half quart as ice cream topping)

BAKING: Bake pies at 400°F for 30 minutes. Check browning on top crust. Add a Pie Crust Shield (you can make your own!) or foil to edges as they begin to brown. Cook for an additional 15-20 minutes, or until filling is bubbly and crust is cooked (check often to prevent over-browning of top crust)

I like to use this All Butter Pie Crust.

NoEmptyChairs.me

4 Comments

Filed under Canning/Freezing, Desserts

Pear Cardamom Bundt Cake with Lime Glaze

32811 129-3

I love the smells of fall baking. That combination of fruits like apples and pears with heavily fragrant cinnamon, cardamom and other spices. This recipe makes a highly adaptable batter that can be made into a bundt cake, quick-bread loaves, or muffins. Or if your bundt pan is on the small side, like mine, a combination of both cake and muffins. Breakfast and dessert all in one shot!

The lime glaze provides a tart, but sweet contrast to the fragrant fall flavors in the pear cake.

32811 130-1

I love cinnamon, but I don’t enjoy large amounts of nutmeg. Small amounts are fine, but I find that it can be very overpowering. One of my favorite fall spices to bake with is cardamom, and I will often swap out nutmeg in a recipe and replace it with cardamom. Cardamom is in the same family as ginger, but it is the seeds and pods that are ground and used for cooking, unlike the root with ginger. It is often used in Indian cooking, but is also a great compliment to cinnamon. It is a versatile spice that can be used in both sweet and savory cooking.

32811 090-1

The recipe below makes enough batter for a 12-cup bundt pan. My bundt pan only holds 10 cups, so I use the recipe to make 6 muffins (measure these out first) and the smaller bundt cake. Without the glaze, the muffins make a great breakfast, and they bake up light and airy.

The pears in this recipe are very finely chopped, or grated. I use a food processor to chop them finely. Pear skins are very thin, so I leave those on. They are not noticeable at all in the baked goods.

32811 094-1

RECIPE:

Pear Cardamom Bundt Cake with Lime Glaze

32811 130-1

Cake:
3 medium pears
about ½ cup buttermilk, milk or plain yogurt (see recipe for exact amount)
¾ cup butter (1 ½ sticks), softened
1 ½ cups brown sugar
3 eggs, lightly beaten
2 tsp vanilla extract
3 cups flour
1 tsp salt
1 tsp baking soda
¼ tsp baking powder
2 tsp ground cinnamon
½ tsp ground cardamom
1 cup finely chopped walnuts or pecans

Lime Glaze, recipe below (optional)

Preheat oven to 350°F. Grease and flour desired pans: one 12-cup bundt pan; one 10-cup bundt pan plus 6 muffin cups; 2 loaf pans; or 24 muffin cups.

Core pears. Finely chop or grate unpeeled pears (I use a food processor) and place in a 2-cup measuring cup. Use a fork to slightly mash the pears (you should have about 1 ½ cups chopped, mashed pears). Add buttermilk to the pears to equal 2 cups. Set aside.

In a medium mixing bowl, beat butter and brown sugar until light and fluffy. Beat in eggs and vanilla. Mix in pear/buttermilk mixture.

In a small bowl, combine flour, salt, baking soda, baking powder, cinnamon and cardamom. Mix into pear batter just until combined. Fold in nuts. Pour batter into desired pans and bake as directed below.

FOR A 12 CUP BUNDT PAN: Bake for 50-60 minutes.

FOR A 10-CUP BUNDT PAN: First scoop batter into 6 muffin cups. Pour remaining batter into 10-cup bundt pan. Bake bundt for 35-45 minutes and muffins for 18-20 minutes.

FOR TWO LOAF PANS: Bake for 50-60 minutes.

FOR 24-26 MUFFINS: Bake for 18-20 minutes.

Lime Glaze (optional):
2 cups powdered sugar
2 Tbs heavy cream
1 Tbs lime juice
zest of one lime

Combine all glaze ingredients and mix until smooth. Add additional lime juice or cream until glaze can be drizzled over cake. Cool cake or loaves completely before drizzling with glaze.

NoEmptyChairs.me

Leave a comment

Filed under Breads, Breakfast/Brunch, Desserts

Roasted Garlic Rosemary Beets

080911 025-1

Beets are a controversial vegetable in our house. Until recently we were split pretty evenly between beet lovers and beet haters. This recipe, however, has made some converts to the beet-loving camp. There are still 2 hold-outs, but that may be due more to stubbornness than actual taste preferences. One child hardly put enough in her mouth to actually taste it before declaring it gross.

Beets are one vegetable that grew really well in my garden this year. I had to fight the deer for the beet greens, but even without their tops, the beets grew undisturbed by the menagerie of wildlife in my backyard these days. I love how prominent the stripes are in the raw beets!

Roasted fresh beets are a whole different animal than those sweet canned things. Add some garlic and rosemary and I think they are divine.

100611 010-1

The cooked beets, unfortunately, don’t look as brilliantly beautiful as the raw ones, but they sure taste great!

100611 019-1

RECIPE:

Roasted Garlic Rosemary Beets

080911 025-1

3 large beets, peeled
2 small sprigs fresh rosemary, minced
3 cloves garlic, sliced thin
2 Tbs olive oil
salt & pepper

Preheat oven to 400°F.

Cut beets into wedges (each beet should make 8 wedges). In a large bowl, stir together beet wedges, minced rosemary, sliced garlic and olive oil. Grind in some fresh salt and pepper and toss to coat.

Place in a shallow baking dish and cover with foil. Bake in preheated oven for 30 minutes. Uncover and bake for another 15-20 minutes, or until beets are tender. Remove from oven and let stand for a few minutes before serving. Taste; add additional salt and pepper, if necessary.

Recipe from Guilty Kitchen

NoEmptyChairs.me

1 Comment

Filed under Side Dishes

Grilled Greek Chicken

100611 029-1

The weather here has turned from dreary, cold and rainy to beautiful, sunny and warm. So I am putting away the soup recipes for a couple of weeks, and firing up the grill. This chicken is marinated in a dressing made from lemon juice, olive oil and Greek spices (including fresh oregano-which is still hanging on in my garden!). The tomato cucumber salad is a nice accompaniment to the grilled chicken, providing a tangy balance to the chicken.

When I prepare chicken or other meat to grill, I always make double and freeze half in a separate Ziploc bag for a quick meal another day. You can either cook all of it and freeze the extra cooked chicken (either whole or diced) to add to future recipes, or freeze the extra raw chicken in the marinade, and then thaw and grill it another day.

100611 020-1

After making the marinade, I put a small amount (about ¼ cup) in a separate Ziploc bag and marinated some fresh asparagus, and then grilled it alongside the chicken. I put the asparagus on the grill at the same time as I turned the chicken over, and they were done at about the same time. Zucchini/summer squash would be another great vege to marinate and grill.

100611 024-1

We ate the grilled chicken and asparagus with this Greek tomato and cucumber salad topped with feta cheese. Most of my garden is done for the year, but I do still have some green tomatoes slowly ripening on my kitchen counter. A couple of nice red ones made for a great fresh end-of-summer salad. You can find the recipe for the salad HERE.

100611 034-1

RECIPE:

Grilled Greek Chicken

100611 029-1

6-8 boneless, skinless chicken breasts
Marinade:
1/3 cup olive oil
1/3 cup  lemon juice
1 tsp fresh lemon zest**
2 cloves garlic, minced
1 Tbs fresh oregano, chopped (or 1 tsp dried oregano)
1 tsp Greek seasoning (or additional oregano)
½ tsp sage
½ tsp marjoram
½ tsp black pepper**

Place chicken breasts in a Ziploc bag. Combine marinade ingredients and pour over chicken. Marinate in refrigerator 6-8 hours or overnight. Remove from refrigerator 30-45 minutes before cooking.

Preheat grill to medium-hot and grill chicken 15-18 minutes, or until well browned and firm but not hard to the touch. Actual cooking time will depend on the thickness of your chicken, the heat of your grill and the temperature outside, so don’t overcook.

**or omit lemon zest and black pepper and substitute 1 tsp lemon-pepper seasoning

FOR GRILLED GREEK ASPARAGUS (OR OTHER VEGETABLE):

1 lb fresh asparagus (or zucchini/summer squash or other vege of choice)
¼ cup marinade from above recipe

Place asparagus or sliced vegetable into a Ziploc bag. Add marinade (be sure to place marinade in vegetable bag before adding it to the chicken bag). Let sit at room temperature for 15-30 minutes (longer is fine too). Grill for 5-6 minutes, or until crisp-tender.

Recipe adapted from Kalyn’s Kitchen

NoEmptyChairs.me

Leave a comment

Filed under Main Dishes, Salads, Side Dishes

Thai Red Chicken Curry

071311 009-1

Looking for a great tasting soup that doesn’t have to cook all day? A healthy, flavorful soup chock full of chicken and fresh vegetables?

This Thai curry is more like a soup than a thick curry that you would eat in small amounts over rice. You can still eat it over rice, if you prefer, but it is light enough that it can be eaten on its own. The vegetables and chicken are quickly stir-fried and then simmered for just a few minutes in a red curry coconut milk sauce. I like to marinate the chicken for a little while in some of the curry paste before cooking, but if you need a really fast meal you can skip that step and have this soup on the table in under 30 minutes.

071311 012-1

RECIPE:

Thai Red Chicken Curry

071311 009-1

1 lb chicken breast, cut into thin strips
1 Tbs Thai red curry paste
2 Tbs soy sauce

2 Tbs olive oil, divided
1 large onion, sliced
1 red bell pepper, julienned
1 medium carrot, julienned
1 medium zucchini, shredded
1 cup sliced mushrooms

2 cans (14 oz) coconut milk
2 Tbs soy sauce
2 Tbs Thai fish sauce
1 Tbs brown sugar (or low-carb golden sweetener)
1 tsp salt
2 Tbs lime juice (or 4 kaffir lime leaves, chopped)
2 Tbs Thai red curry paste (adjust amount to personal taste)

1 cup fresh spinach or other greens (I used beet greens)
1/3 cup fresh basil (Thai basil preferably), coarsely chopped

Combine cubed chicken, 1 Tbs curry paste and soy sauce in Ziploc bag. Let marinate 30 minutes at room temperature, or several hours in refrigerator.

Heat 1 Tbs oil in wok or large saucepan. Add onion, red pepper, carrot, zucchini, and mushrooms. Cook over high heat until crisp-tender. Remove from pan. Add remaining 1 Tbs oil to pan. Add chicken and cook, stirring, over high heat until cooked through.

Add coconut milk, soy sauce, fish sauce, brown sugar, salt, lime juice, and remaining 2 Tbs curry paste to the chicken in the pot. Bring to a boil. Lower heat and simmer for 10 minutes.

Stir in spinach, basil, and cooked vegetables. Heat until spinach wilts. Serve in bowls with or without rice.

NoEmptyChairs.me

Leave a comment

Filed under Main Dishes, Soups/Stews/Curries