Tag Archives: cake

Strawberry Lemonade Cake

Strawberry Lemonade Cake 1

Strawberries and lemons are a perfect pairing for a sweet summer dessert. This cake has three layers of lemon cake filled with a strawberry Swiss meringue buttercream and garnished with candied lemon peels and whole strawberries.

Candied lemons are easy to make; just be sure to slice the lemons very thinly and remove any seeds. The leftover syrup can be used to sweeten a pitcher of fresh lemonade!

Candied Lemon Peel

Swiss Meringue Buttercream is a light and airy frosting that is not too sweet. The addition of strawberry puree makes it extra delicious!

Strawberry Lemonade Cake 2

RECIPES:

Continue reading

1 Comment

Filed under Desserts

Chocolate Butterfly Cupcakes

(and a gender reveal–NO, not mine)

Chocolate Butterfly Cupcakes 13

I first made these chocolate butterfly cupcakes for my sweet Little J’s 6th birthday. I was feeling very nostalgic about having my last baby in kindergarten and we had a super fun cooking party with a few of her friends. It is (by far) my favorite kids’ birthday party that I’ve hosted. I still get a little bit weepy just thinking about it. If you like a good sentimental cry, you can read about it HERE.

Then last month, a friend asked if I could make some gender reveal cupcakes to announce the sex of their upcoming new baby to their other four children. While I am perfectly content with the 5 children I already have and have no desire to start again with another one (5 years and counting until we are empty nesters!), celebrating with other new moms always makes me reflect on my own babies that are not babies any more.

So I happily agreed, and immediately knew that I wanted to make these butterflies again, for my friend and her family who are welcoming a new life into their family, and for me to reminisce about my own little ones and the joy it has been parenting them. And having my Little J (who isn’t so little anymore) help me make the butterflies and cupcakes was a really great experience.

And because writing this is making me feel nostalgic all over again (and this is my blog so I get to indulge my wistful feelings as much as I want), here is my Little J, then and now:

Little J 2010 2017-09-13 15.54.09

Enough about me and my maudlin ramblings; you really just want to hear about the cupcakes. For my friend, I made my favorite dark chocolate cupcakes. They are tender and moist and absolutely delicious. It also doesn’t hurt that they are easy to make. They start with a cake mix, but the addition of pudding and sour cream takes them well beyond your average chocolate cupcake.

For the “gender reveal”, I cut out a section of the top of each cupcake and filled it with a blue filling (It’s a Boy!!). For the filling, I mixed the white frosting with some of the leftover blue candy melts from the butterflies and piped it into the cut-out centers.

Chocolate Butterfly Cupcakes 9

The frosting I used is a cooked vanilla frosting. It is not as sweet as a traditional buttercream, but is light and fluffy and delicious. I tinted the frosting with pink and blue food coloring to make a striped frosting.

Chocolate Butterfly Cupcakes 10

To create the two-toned look, use a paintbrush and food coloring to paint stripes onto the inside of a pastry bag. (Credit to my hand model Little J!) Carefully spoon white frosting into the bag. Before frosting the cupcakes, squeeze out a small amount of frosting until the color begins to show in the frosting. I used a 1M tip to pipe the frosting onto the cupcakes.

Chocolate Butterfly Cupcakes 11

Now on to the butterflies. Full disclosure: these are time consuming. But they are not particularly difficult. Just be prepared to spend several hours making them if you plan to make a lot.

Items needed:
chocolate and colored candy melts, stencil printed on paper, waxed paper, toothpicks, foil, pastry bags (one for each color), one writing piping tip, small round sprinkles. Optional: heating pad

Draw your desired butterfly wing shape onto a sheet of white paper using a permanent marker. Cut pieces of waxed paper (one for each set of wings you are making) large enough to cover the stencil. You can also draw a set of antennae if desired (see example HERE).

Chocolate Butterfly Cupcakes 1

Place a small amount of colored and chocolate melting disks into separate pastry bags or Ziploc bags. Melt in microwave—Start with 30 seconds, squish bags, then add an additional 10 seconds if not completely melted.

To keep the chocolate melted while making dozens of wings, I placed a piece of plastic wrap over a heating pad and set the bags on the heating pad while they weren’t being used.

Chocolate Butterfly Cupcakes 4

I used a writing tip to pipe the chocolate, but I just cut off a small end of the bag to squeeze out the melted colored candy.

Place a small square of waxed paper over your stencil paper. Use the melted chocolate to trace around the edge of one wing at a time.

Chocolate Butterfly Cupcakes 2

While the chocolate outline is still wet, squeeze a small amount of colored chocolate into the center of each wing section. I used pink in the top section and blue in the bottom section. Use a toothpick to spread colored chocolate to fill the wing. Use a toothpick to gently swirl chocolate edges and colored chocolate. Sprinkle edges of wings with round sprinkles, if desired.

Work with just one wing at a time. The chocolate hardens quickly!

Chocolate Butterfly Cupcakes 3

Let the wings harden completely before assembling butterflies.

Chocolate Butterfly Cupcakes 6

To make the body and assemble the butterflies, fold a piece of heavy-duty aluminum foil in half and then into a v-shape with a flat bottom (about 1/2” wide).

Chocolate Butterfly Cupcakes 16

Using the melted chocolate (remove the writing tip), pipe a body onto a separate piece of waxed paper (or directly onto the bottom section of the folded foil). Make little dollops of chocolate, being sure that they touch.

Chocolate Butterfly Cupcakes 15

Place segmented body (before it hardens) into the folded foil and place the wings at an angle into the still soft chocolate body. Prop them up underneath if the foil doesn’t hold them. (Sorry, I didn’t get a photo of this step)

Don’t use your fingers to support the wings while the body dries: the chocolate will melt in your fingers and ruin the wings.

Chocolate Butterfly Cupcakes 7

Chocolate Butterfly Cupcakes 8

Gently press a butterfly onto the top of each frosted cupcake.

Chocolate Butterfly Cupcakes 13

Did you know that a group of butterflies is called a “Kaleidoscope.” What a perfect description of these butterflies! Whatever they are officially called, your family will call them beautiful and delicious!

Chocolate Butterfly Cupcakes 14

RECIPES:

Dark Chocolate Cupcakes

  • Servings: 30-36 cupcakes
  • Print

Chocolate Butterfly Cupcakes 11

1 box dark chocolate fudge cake mix
1 small box (3.9 oz) instant chocolate pudding mix
1 cup sour cream
1 cup vegetable oil
4 eggs
½ cup warm water

Preheat oven to 350°F . Place cupcake liners in muffin tins.

In a large bowl, mix together all of the ingredients and beat with a mixer for 2 minutes.

Fill cupcake liners just over halfway. Bake for 18-20 minutes, or until a toothpick inserted in the center comes out clean. Cool completely before frosting.

NoEmptyChairs.me

Cooked Vanilla Frosting

  • Servings: frosting for 24-36 cupcakes
  • Print

Chocolate Butterfly Cupcakes 11

2 cups whole milk
10 Tbs flour
2 tsp vanilla
2 cups butter
2 cups granulated sugar (do not use powdered sugar)
Optional: gel food coloring

In a small saucepan, mix the flour and milk until no lumps remain. Heat over medium heat, stirring constantly with a whisk, until mixture thickens (and is just about to boil). Remove from heat and let it cool completely to room temperature.  Stir in vanilla.

In a large mixing bowl (a stand mixer works best for this) cream the butter and sugar until light and fluffy. Beat in the cooled milk mixture and beat for 5-7 minutes, until frosting is light, fluffy and completely uniform throughout. Beat in food coloring, if desired.

This frosting looks best when piped with a large decorating tip, but can also be spread with a spatula.

NoEmptyChairs.me

Chocolate Butterflies (Cupcake Toppers)

Butterfly Cupcakes 001  Chocolate Butterfly Cupcakes 13

Ingredients and Equipment:

Melting chocolate (both chocolate and colored)
Sprinkles (small round)
Waxed paper
Toothpicks
Ziploc bags or pastry bags
Writing tip
Butterfly stencil
Aluminum foil

Assembly Instructions:

  • Trace wing and antennae pattern onto a piece of white paper.
  • Place a small amount of colored and chocolate melting disks into separate pastry bags or Ziploc bags. Melt in microwave—Start with 30 seconds, knead bags, then add an additional 10 seconds if not completely melted. Place a round writing tip on the bag with the chocolate, and cut off one corner of each colored candy bag.
  • To keep the chocolate melted while making dozens of wings, place a piece of plastic wrap over a heating pad and set the bags on a heating pad while not using.
  • Place a small square of waxed paper over your stencil paper. Use the melted chocolate to trace around the edge of one wing at a time.Chocolate Butterfly Cupcakes 2  Chocolate Butterfly Cupcakes 3
  • While the chocolate outline is still wet, squeeze a small amount of colored chocolate into the center of each wing section. I used pink in the top section and blue in the bottom section. Use a toothpick to spread colored chocolate to fill the wing. Use a toothpick to gently swirl chocolate edges and colored chocolate. Sprinkle edges of wings with round sprinkles, if desired.
  • Work with just one wing at a time. The chocolate hardens quickly! Let the wings harden completely before assembling butterflies.
  • Fold a piece of heavy-duty aluminum foil in half and then into a v-shape with a flat bottom (about 1/2” wide).Chocolate Butterfly Cupcakes 16  Chocolate Butterfly Cupcakes 15
  • Using the melted chocolate (remove the writing tip), pipe a body onto the bottom section of the folded foil. Make little dollops of chocolate, being sure that they touch.
  • Place the wings at an angle into the still soft chocolate body. Prop them up underneath if the foil doesn’t hold them. Let butterflies harden completely before gently peeling off of foil and placing on cupcakes.Chocolate Butterfly Cupcakes 7

NoEmptyChairs.me

2 Comments

Filed under Desserts

Gingerbread with Lemon Sauce and Cinnamon Whipped Cream

Gingerbread with Lemon Sauce and Cinnamon Whipped Cream 2

Traditional gingerbread –the cake, not the cookie, although those are good too — is one of my favorite desserts, but one I hardly ever get to eat. Gingerbread just feels like it should only be a Christmas dessert, and there are always so many treats around Christmas time, that this fabulously simple dessert sometimes gets bumped from the menu.

I think gingerbread should get a whole season of love, not just a single holiday at the busiest time of year. Pumpkin gets a full four months of love; gingerbread should get the same respect.

Gingerbread is a simple to make cake that is great alone, but also pairs wonderfully with a tart lemon sauce and cinnamon flavored whipped cream.

Gingerbread with Lemon Sauce and Cinnamon Whipped Cream 4

RECIPE:

Gingerbread with Lemon Sauce and Cinnamon Whipped Cream

Gingerbread with Lemon Sauce and Cinnamon Whipped Cream 2
Gingerbread:
½ cup sugar
½ cup butter, softened
1 egg
1 cup molasses (NOT blackstrap: or use ½ cup blackstrap + ½ cup corn syrup)
1 tsp vanilla
2 ½ cups flour
1 ½ tsp baking soda
½ tsp salt
1 tsp ground cinnamon
1 tsp ground ginger
½ tsp ground cloves
1 cup very hot water

Preheat the oven to 350°F. Grease a 9X13-inch baking pan and set aside.

In a large mixing bowl, cream the butter and sugar until well blended. Add the egg, molasses and vanilla and mix again.

Combine flour, baking soda, salt and spices in a separate bowl and use a whisk to mix well. Add to mixing bowl and mix well. Add the hot water and beat until smooth. Batter will be thin.

Pour the batter into the prepared pan and bake for 30-35 minutes, until a toothpick inserted in the center comes out clean. Don’t overbake or the gingerbread will be dry.

Serve the gingerbread warm or at room temperature with lemon sauce and/or cinnamon whipped cream.

Cinnamon Whipped Cream:
2 cups heavy whipping cream
½ tsp vanilla extract
¼ tsp cinnamon
¼ cup powdered sugar
In a medium bowl, begin beating the whipped cream and vanilla until soft peaks form. Add the cinnamon and powdered sugar and beat until medium-stiff peaks form. Store in refrigerator until ready to serve.

Lemon Sauce:
1 ½ cups sugar
3 Tbs cornstarch
¼ tsp salt
1 ½ cups cold water
½ cup fresh squeezed lemon juice
5 egg yolks
2-3 tsp grated lemon zest
2 Tbs butter
1 tsp vanilla

In a medium saucepan, use a whisk to mix sugar, cornstarch and salt. Stir in water and lemon juice. In a small bowl, whisk egg yolks until well mixed and then mix into saucepan. Cook over medium heat until thickened and bubbly. Stir in lemon zest, butter and vanilla. Cook until butter melts and then remove from heat. Serve warm.

Adapted from Mel’s Kitchen Cafe

NoEmptyChairs.me

Leave a comment

Filed under Desserts

Chocolate Raspberry Vanilla Mousse Cake

Chocolate Raspberry Vanilla Mousse Cake 5

This is a fabulous, decadent cake made from layers of chocolate, raspberry and vanilla mousses on a brownie crust. It is not as sweet as a normal frosted cake, but the mousses are definitely rich and creamy. Serve this in small slices. A whole cake will go a long way, feeding at least 12-18 people.

I first made this cake with Little J about a month ago for my birthday, after seeing it on Sugar Hero. I made a few changes to it then, and then some more changes when I made it a second time for a church youth event. I still found the brownie layer to be much too rich in the first two versions of this recipe, so I tried yet again and am now happy with the results!

Chocolate Raspberry Vanilla Mousse Cake 4

The length of the recipe looks intimidating, but basically you are just making a one-bowl brownie layer, then repeating the mousse layer in three different flavors and topping with a simple chocolate ganache. I won’t lie: it does take ALL DAY to make. But that is mostly because there are a number of cooling/chilling steps, since the mousse layers each need to firm up before spreading on the next layer. And if you make your own raspberry puree, that adds more time to the process. Straining raspberry seeds is not one of my favorite things, but the result is definitely worth it.

The only special equipment you need to make this cake are a springform pan (or cake pan with removable bottom) and an acetate cake collar at least 4” high.

The final cake is taller than a regular springform pan, and you want the sides to be smooth, so a cake collar is a real help putting this together.

Chocolate Raspberry Vanilla Mousse Cake Cake Collar 1

You can make your own using parchment paper or foil, but it is hard to get it completely smooth. I used non-stick foil the first time I made this cake, and then bought some cake collars on Amazon for my next try at it. Here are the differences in final texture between the foil collar and real cake collar:

Chocolate Raspberry Mousse CakeChocolate Raspberry Vanilla Mousse Cake 5

If you have an egg allergy, this is a perfect cake. The mousse layers contain no eggs at all. The brownie layer does contain an egg, but you could leave that layer off or use an egg substitute for that one egg. This dessert is also really pretty layered in parfait glasses. I made one parfait version for our chocolate-hating son, just layering the raspberry and vanilla mousses and fresh berries.

Chocolate Raspberry Vanilla Mousse Cake 6

RECIPE:

Chocolate Raspberry Vanilla Mousse Cake

Chocolate Raspberry Vanilla Mousse Cake 5

Brownie Layer:
¼ cup semisweet or bittersweet chocolate chips
4 Tbs unsalted butter
½ cup sugar
1/8 tsp salt
1 tsp vanilla
1 egg
1/3 cup flour

Chocolate Mousse Layer:
1 ¾ cups heavy cream, divided
6 oz (1 cup) semisweet chocolate chips
1 pkt (2 tsp) unflavored gelatin
2 Tbs water
Pinch salt
1 tsp vanilla

Raspberry  Mousse Layer:
1 ½ cups heavy cream, divided
6 oz (1 cup) white chocolate chips
1 pkt (2 tsp) unflavored gelatin
2 Tbs water
Pinch salt
t tsp vanilla
1 cup Sweetened Raspberry Puree or seedless raspberry jam

Vanilla  Mousse Layer:
1 ¾ cups heavy cream, divided
6 oz (1 cup) white chocolate chips
1 pkt (2 tsp) unflavored gelatin
2 Tbs water
3 Tbs powdered sugar
Pinch salt
1 vanilla bean
t tsp vanilla

Chocolate Ganache & Topping:
1/3 cup heavy cream
1 Tbs corn syrup
3 oz (1/3 cup) bittersweet chocolate chips
1 pint fresh raspberries

Brownie Layer:
Preheat oven to 350°F. Spray a 9” springform pan lightly with baking spray. Line bottom of pan with a round of parchment paper and then spray again with baking spray.

Place chocolate chips and butter in a microwave safe bowl. Heat in 30 second increments, stirring after each heating until melted. Stir in sugar, salt and vanilla; mix well. Stir in egg and mix well. Stir in flour until just combined.

Spread into prepared pan and bake for 15-17 minutes. Cool completely.

Chocolate Mousse Layer:
Place ¾ cup of the cream in a Pyrex measuring cup and heat in microwave for 1 minute, or until hot. Add chocolate chips to hot cream. Let sit for 1 minute and then stir until smooth. Cool to room temperature. Place water in a small bowl and sprinkle gelatin over the surface of the water. Let sit while chocolate cools. Place remaining 1 cup cream, salt, and vanilla in a large bowl and whip until stiff peaks form. Microwave gelatin mixture for 15 seconds to melt gelatin; stir into chocolate. Pour chocolate mixture into whipped cream and beat briefly with a mixer to partially mix. Use a spatula to fold mousse until well mixed.

Place a 4” cake collar or a strip of non-stick foil around the inside of the springform pan. Spread chocolate mousse over the brownie layer, spreading to the edge of the pan. Refrigerate for 1 hour, or until mousse is firm.

Raspberry Mousse Layer:
Place ½ cup of the cream in a Pyrex measuring cup and heat in microwave for 1 minute, or until hot. Add white chocolate chips to hot cream. Let sit for 1 minute and then stir until smooth. Cool to room temperature. Place water in a small bowl and sprinkle gelatin over the surface of the water. Let sit while chocolate cools. Place remaining 1 cup cream, salt, and vanilla in a large bowl and whip until stiff peaks form. Microwave gelatin mixture for 15 seconds to melt gelatin; stir into chocolate. Pour white chocolate mixture and raspberry puree into whipped cream and beat briefly with a mixer to partially mix. Use a spatula to fold mousse until well mixed.

Spread raspberry mousse over the chocolate mousse layer, spreading to the edge of the pan. Refrigerate for 1 hour, or until mousse is firm.

Vanilla Mousse Layer:
Place ¾ cup of the cream in a Pyrex measuring cup and heat in microwave for 1 minute, or until hot. Add white chocolate chips to hot cream. Let sit for 1 minute and then stir until smooth. Cool to room temperature. Place water in a small bowl and sprinkle gelatin over the surface of the water. Let sit while chocolate cools. Place remaining 1 cup cream, powdered sugar, salt, seeds from vanilla bean, and vanilla in a large bowl and whip until stiff peaks form. Microwave gelatin mixture for 15 seconds to melt gelatin; stir into chocolate. Pour white chocolate mixture  into whipped cream and beat briefly with a mixer to partially mix. Use a spatula to fold mousse until well mixed.

Spread vanilla mousse over the raspberry mousse layer, spreading to the edge of the pan. Refrigerate for 1 hour, or until mousse is firm.

Chocolate Ganache & Topping:
Place cream and corn syrup in a Pyrex measuring cup and heat in microwave for 1 minute, or until hot. Add chocolate chips to hot cream. Let sit for 1 minute and then stir until smooth. Cool until a thick pouring consistency.

Remove sides of the springform pan. Run a sharp knife along the top edge of the vanilla mousse layer to keep it from sticking to the cake collar. Carefully remove cake collar. Remove cake from bottom of the springform pan and place on serving dish.

Spread the ganache over the top of the cake and allow to drip down the sides of the cake. Place fresh raspberries in the center of the cake. Refrigerate until ready to serve.

Sweetened Raspberry Puree
12 oz raspberries, fresh or frozen (about 2 ½ cups of not-crushed fresh berries)
½ cup water
½ cup sugar
½ Tbs lemon juice
2 Tbs cornstarch
¼ cup cold water

In a heavy saucepan, combine raspberries, ½ cup water, sugar, and lemon juice. Bring to a boil. Reduce heat and simmer for 5 minutes, crushing berries slightly with the back of a spoon. Strain the berries through a fine sieve, pushing the pulp through the sieve with the back of a spoon or a pestle. Return seedless puree to the saucepan (rinse saucepan first if there are seeds clinging to the sides). Mix the cornstarch and water in a small bowl; stir into puree in the saucepan. Return mixture to a boil; lower heat and simmer for 1-2 minutes, or until slightly thickened and no longer cloudy. Cool before using.

Yield: about 1 ¾ cups seedless puree

(Inspired by Sugar Hero)

NoEmptyChairs.me

3 Comments

Filed under Desserts

Caramel Pumpkin Cupcakes

Caramel Pumpkin Cupcakes 3

Don’t these cupcakes just scream “Autumn!” If the temperature were to drop below 80° I might be able to believe that fall had actually arrived. So maybe they are just screaming “Eat Me Regardless of the Season!”

Little J made these Caramel Pumpkin Cupcakes for our neighborhood chili cook-off and kids’ bake-off. She made them completely on her own (except for some help making the salted caramel to drizzle on top). She did all of the baking and decorating herself, though. Her efforts paid off: she came home with the prize for best-tasting dessert! She was very excited.

2016-10-29 17.07.16

This pumpkin cupcake batter is extremely versatile. We have used it to make Pumpkin Cupcakes, Pumpkin Bars, Pumpkin Sheet Cake, Pumpkin Bread. It adapts well to any size pan you choose to bake it in.

The frosting is a delicious caramel cream cheese icing. You start by making a simple caramel on the stovetop and then beating in cream cheese and a little extra powdered sugar. If you are going to pipe it onto cupcakes, it benefits from a good chill in the fridge to firm it up a little, followed by another beating with a mixer once it has chilled. So start your baking by making the frosting first and then move on to the cupcakes while the frosting chills.

The salted caramel drizzle is optional, but really makes a big difference. The recipe below makes much more salted caramel than you need to drizzle on the cupcakes, but it is also great for topping ice cream and chocolate cake. Or for dipping apples. Or for stirring into hot cocoa. Or for licking off of spoons. Or use your leftover caramel to drizzle over any of these other desserts:

Salted Caramel Banana Cream Pie

Caramel Apple Cheesecake Tart

Apple Pie

Triple Chocolate Bundt Cake

Vanilla Cheesecake

Double Chocolate Waffles

Cream Puffs

Caramel Pumpkin Cupcakes 2

RECIPE:

Pumpkin Caramel Cupcakes

Caramel Pumpkin Cupcakes 3

Pumpkin Cupcakes:

4 eggs
1 2/3 cup sugar
1 cup oil
1 tsp vanilla
1 16oz can of pumpkin (about 2 cups)
2 cups flour
2 tsp baking powder
1 tsp baking soda
1 tsp salt
2 tsp cinnamon
½ tsp ground ginger
¼ tsp nutmeg

Preheat oven to 350°F. Line muffin pans with 24 paper liners.

Using a mixer, beat eggs, sugar, oil, vanilla and pumpkin until light and fluffy.  In a separate bowl, stir together flour, baking powder, baking soda, salt, cinnamon, ginger and nutmeg. Fold into pumpkin mixture.

Scoop batter into lined muffin pans. Bake for 18-20 minutes, or until toothpick inserted in center comes out clean.Remove from pan and cool completely.

Use a pastry tip (I used Wilton 1M) to frost the cupcakes. Drizzle with salted caramel.

Store frosted cupcakes in the refrigerator if they are going to be left out for more than a few hours.

Makes 24 cupcakes.


Caramel Cream Cheese Icing:

½ cup unsalted butter
½ cup heavy cream
1 cup dark brown sugar
2 pkg (8 oz each) cream cheese
2 tsp vanilla extract
1/8 tsp salt
1 cup powdered sugar

Place butter, cream and brown sugar in a medium saucepan. Stir together over medium heat until mixture comes to a boil. Reduce heat to medium-low and simmer for 12 minutes, stirring occasionally. Remove from heat and pour into a mixing bowl. While caramel is hot, beat in cream cheese, vanilla and salt until well mixed. Beat in powdered sugar. Cover and place frosting in the refrigerator for at least 1 hour. When frosting has chilled, beat again until light and fluffy. Store leftovers in the refrigerator.

Salted Caramel Drizzle:
1 cup sugar
6 Tbs butter, softened and cut into tablespoon-sized chunks
½ cup heavy cream
½ – 1 tsp tsp flaky or coarse sea salt
1 tsp vanilla (and/or seeds scraped from 1 vanilla bean)

Place sugar in a medium to large saucepan (mixture will bubble up and expand as cool ingredients are added to the hot pan). Cook over medium heat until sugar just begins to melt. Stir gently, trying to keep sugar crystals off of the sides of the pan. Continue to cook, stirring occasionally, until sugar melts completely and is a medium amber color (about 350°F if you use an instant-read thermometer). Reduce heat to low and quickly whisk in butter chunks, stirring constantly.

Stir in cream, stirring constantly until smooth. Stir in salt and vanilla. Pour caramel immediately into a glass jar or heat-safe bowl to cool. Do NOT scrape sides or bottom of the pan with a spatula. If you do, you are likely to get sugar crystals into your nice smooth caramel. If the caramel has formed crystals while cooking, you can pour it from the pan through a fine sieve into the jar to remove any crystals before cooling.

Caramel can be kept in a covered jar at room temperature for several weeks.

NoEmptyChairs.me

Salted Caramel Sauce

  • Servings: Makes about 1 cup
  • Print

Salted Caramel Sauce 1

1 cup sugar
6 Tbs butter, softened and cut into tablespoon-sized chunks
½ cup heavy cream
½ – 1 tsp tsp flaky or coarse sea salt
1 tsp vanilla (and/or seeds scraped from 1 vanilla bean)

Place sugar in a medium to large saucepan (mixture will bubble up and expand as cool ingredients are added to the hot pan). Cook over medium heat until sugar just begins to melt. Stir gently, trying to keep sugar crystals off of the sides of the pan. Continue to cook, stirring occasionally, until sugar melts completely and is a medium amber color (about 350°F if you use an instant-read thermometer). Reduce heat to low and quickly whisk in butter chunks, stirring constantly.

Stir in cream, stirring constantly until smooth. Stir in salt and vanilla. Pour caramel immediately into a glass jar or heat-safe bowl to cool. Do NOT scrape sides or bottom of the pan with a spatula. If you do, you are likely to get sugar crystals into your nice smooth caramel. If the caramel has formed crystals while cooking, you can pour it from the pan through a fine sieve into the jar to remove any crystals before cooling.

Caramel can be kept in a covered jar at room temperature for several weeks.

NoEmptyChairs.me

1 Comment

Filed under Desserts

Chocolate Raspberry Truffle Cake

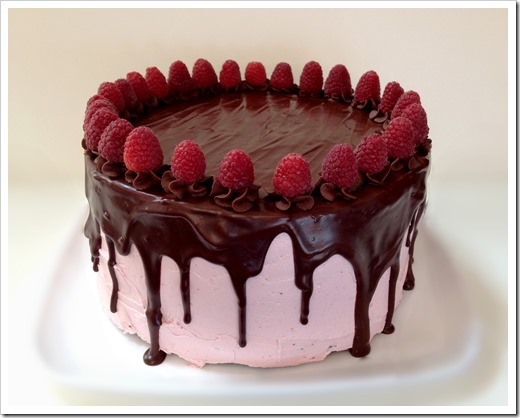
Chocolate Raspberry Truffle Cake 3

I have made three of these cakes in the last month. One for a Boy Scout fundraising auction and two more for a dinner for a visiting Apostle of the Church of Jesus Christ of Latter-Day Saints (Elder Jeffrey R. Holland) who was here with Elder Hallstrom of the Seventy giving training to local missionaries and ward and stake leaders. Elder Holland was president of BYU when I was there, and is one of my favorite speakers, so it was really nice to meet him.

I dragged four of my kids along to help me serve, and they were really great about it, even Big J, (who returned home from serving a mission just the night before and only complained slightly about having to put his suit back on the day after coming home) and Middle K (who was celebrating her 17th birthday that day and chose to come help serve instead of having her own birthday celebration). They even washed and dried TONS of dishes! I was certainly proud of all of them that day.

We did have cake left over, so we were able to wish Middle K a very happy 17th birthday with leftover cake. She didn’t mind one bit.

Chocolate Raspberry Truffle Cake 5

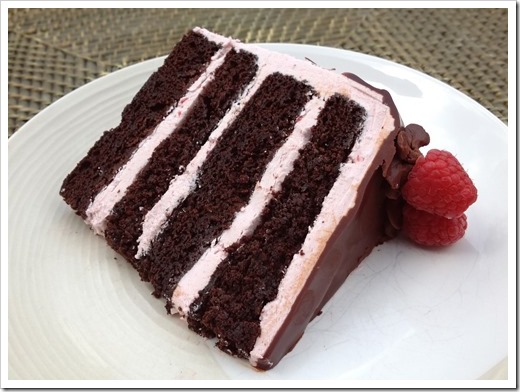
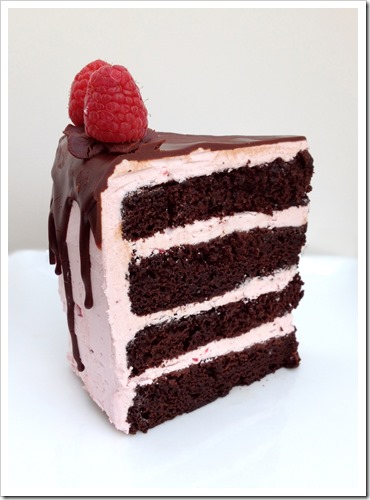
This cake is made with 2 layered chocolate cakes, cut in half to make four layers. Two of the layers are drizzled with a very thin layer of chocolate ganache and then it is filled with a Raspberry Swiss Meringue Buttercream Icing. The entire cake is then frosted with the raspberry frosting and the top is drizzled with more ganache. It is finished with stars piped from cooled ganache topped with fresh raspberries. I am not usually a big chocolate cake eater, but chocolate and raspberry are such a great flavor combination that I make an exception in this case!

Chocolate Raspberry Truffle Cake 4

I first saw this cake on Annie’s Eats, but used my own chocolate cake and frosting recipes to assemble it.

RECIPE:

Chocolate Raspberry Truffle Cake

Chocolate Raspberry Truffle Cake 1

Ingredients (recipes below):
Chocolate Layer Cake
Raspberry Swiss Meringue Buttercream
Chocolate Ganache
Fresh Raspberries, for garnish

Chocolate Layer Cake
2 cups flour
½ cup regular cocoa powder
½ cup Dutch process cocoa (or Hershey’s Special Dark)
1 ½ tsp baking soda
½ tsp salt
¾ cups (1 ½ sticks) unsalted butter, softened
1 cup sugar
1 cup brown sugar
3 eggs, at room temperature
2 tsp vanilla extract
1 ½ cups buttermilk

Preheat oven to 350°F. Lightly grease 2 9” cake pans; line bottom of pans with parchment paper. Grease paper and then dust entire pan with cocoa powder.

Combine flour, cocoa powders, baking soda and salt. Mix with a whisk. In a large mixing bowl, beat butter and sugars for 5 minutes. The mixture should be very pale and fluffy. Beat in eggs and vanilla. Add flour mixture alternately with buttermilk, beginning and ending with flour mixture. Beat just until smooth.

Divide batter into prepared pans and bake for 28-30 minutes or until toothpick comes out clean. Cool in pans for 10 minutes. Invert onto wire racks, remove parchment paper and cool.

Cooled cake layers can be wrapped in plastic wrap and frozen until you are ready to assemble them. (For this cake, if you are freezing the layers: cut each layer in half before freezing to make 4 layers).

Raspberry Swiss Meringue Buttercream Icing
1 ½ cups egg whites (about 12 large egg whites, or use pasteurized egg whites that come in a carton)
2 ½ cups sugar
pinch of salt
3 cups unsalted butter (6 sticks), at room temperature**
1 Tbs vanilla extract
about 1 ½ cups Raspberry filling (see recipe below) or 1 cup raspberry jam

In the top of a double boiler, stir together  egg whites, sugar and salt. Bring water in bottom of double boiler to a low simmer; cook until the temperature of the egg whites reaches 160°F and sugar is completely dissolved (rub mixture between fingertips-it should not feel gritty). Mixture will be foamy and not a uniform consistency.

Transfer the egg white mixture to the bowl of a stand mixer. With the whisk attachment, whip until meringue is completely cooled and glossy peaks form, about 10 minutes. DO NOT ADD BUTTER UNTIL BOTH THE BOWL AND FROSTING ARE COMPLETELY COOL. Switch mixer attachment from the whisk to paddles. Add butter 1-2 Tablespoons at a time until incorporated. Mixture may appear curdled at times. Continue beating until butter is fully incorporated and frosting is fluffy and smooth.  This will take about 10 minutes.  Add vanilla and beat smooth. Add cooled raspberry filling and beat until frosting is a uniform color (start with about 1 cup filling, beat, and then add more if you want a more pronounced raspberry flavor).

**BUTTER NOTE: butter should be room temperature soft, but not at the point of melting. If the butter is too cold, it will not incorporate well into the meringue, and you will have butter chunks. If the butter is over-soft, it will cause the icing to curdle while beating-this is okay, it isn’t ruined: it will just take longer (more beating) for the frosting to become smooth. If icing still won’t set, place in the fridge for 20 minutes, and then beat again.

Raspberry Filling
12 oz raspberries, fresh or frozen (about 2 ½ cups of not crushed fresh berries)
½ cup sugar
½ Tbs lemon juice
½ cup water
2-3 Tbs cornstarch or ClearJel
¼ cup cold water

In a heavy saucepan, combine raspberries, sugar and lemon juice. Bring to a boil. Reduce heat and simmer for 5 minutes, crushing berries slightly with the back of a spoon. Strain the berries through a fine sieve, pushing the pulp through the sieve with the back of a spoon. Gradually stir ½ cup water into the seeds in the sieve (over the bowl) and press again to remove as much pulp as possible. Return seedless puree to the saucepan (rinse saucepan first if there are seeds clinging to the sides). Mix the cornstarch and ¼ cup water in a small bowl; stir into puree in the saucepan. Return mixture to a boil; lower heat and simmer for 1-2 minutes, or until slightly thickened and no longer cloudy. Cool completely (or chill) before using.

Chocolate ganache:
8 oz bittersweet chocolate, chopped (about 1 heaping cup)
1 cup heavy cream
¼ cup corn syrup

Place the chopped chocolate into a small bowl and set aside. In a Pyrex measuring cup or microwavable bowl, combine the heavy cream and corn syrup. Heat for 1 minute; stir. Pour the hot cream over the chopped chocolate. Let sit for one minutes, then stir until smooth with a whisk.

Cake Assembly:

Completely cool cake layers. Cut each layer in half to make 4 layers. Prepare frosting and ganache.

Place waxed paper strips along edges of serving plate. Place one cake layer, cut side up, on the serving plate. Waxed paper strips should cover the exposed part of the plate, but not be too far under the cake layer. Spread a very thin layer of warm ganache (about 2-3 Tbs) over cake (it will begin to soak into the cake). Spread cake with a layer of raspberry icing. Repeat with remaining 3 cake layers (I only put ganache between the 2 cut layers of cake). Ice entire cake with a thin crumb coat of icing. Refrigerate cake for 2o minutes to set slightly (optional). Create a smooth finish with remaining icing over entire cake (top of cake should be completely flat).

Set aside about ¾ cup of the ganache. Drizzle top of cake with the remaining ganache, letting it drip down the sides. Refrigerate cake.

When ganache on cake has set and the remaining ganache has set to a piping consistency (place in the refrigerator to thicken faster), spoon remaining ganache in a pastry bag fit with a large star tip (I used Wilton 1M). Pipe stars around the edge of cake. Top each star with a fresh raspberry. Serve cake at room temperature.

Storage:  Cake can be stored in the refrigerator or at room temperature. The fresh raspberries will not keep at room temperature very long, but the cake tastes best when served at room temperature (when chilled, the icing will become VERY firm). When I am making this cake ahead of time, I store it in the refrigerator, and remove it to room temperature about 3 hours before serving.

(Inspired by Annie’s Eats)

NoEmptyChairs.me

9 Comments

Filed under Desserts