Twelve Days of Christmas Cookies: Swedish Peppar KaKar

DSC04393

DAY 1: Welcome to Twelve Days of Christmas Cookies. For the next twelve days, we will be baking Christmas cookies around here. This is one of my favorite Christmas traditions: baking with my children. It is fun to see them get excited about the traditional cookies that we always make every year. We also enjoy looking through cook books and online together to find a new recipe or two to try. And the best part is deciding on friends and neighbors to share them with! Today we start out with a family favorite.

These are not your average gingerbread cookies. They are so much better! The traditional gingerbread flavors are all there, but there is only a little bit of molasses, which gives them a nice mild flavor. Bake them for just a short time, and they are soft and wonderful. We love to use our tiny gingerbread man and angel cookie cutters for these. They are only about 1 ½-inches tall. Super cute! But be careful, they are very addictive. And when you can pop a whole cookie in your mouth in one shot, it is easy to talk yourself into “just one more”.

You could pipe an icing around the edges or to make faces, if you want, but they are great just on their own. We end up with enough other cookies filled or topped with frosting that it is nice to have a less sweet, but super flavorful “plain” cookie.

DSC04171 _DSC04189

My little gingerbread helpers!

DSC04383

DSC04198-2

RECIPE:

Swedish Peppar KaKar

  • Servings: Makes about 60 mini cookies
  • Print

DSC04393

(soft, mild Gingerbread cookies)

2 cups flour
1 tsp baking soda
1 ½ tsp ground ginger
1 tsp cinnamon
½ tsp ground cloves
½ tsp salt
½ cup butter
¾ cup sugar
1 egg, beaten
2 tsp molasses

Combine dry ingredients; set aside. Cream butter and sugar. Blend in egg and molasses. Add dry ingredients; mix well. Add a little bit more flour (up to ¼ cup), if necessary, to get a dough that is soft, but not sticky.

Chill dough for 1 hour. Roll and cut into small shapes (gingerbread men and/or angels).

Bake at 350°F for 6 to 8 minutes. Don’t overbake, or they will become crispy instead of soft.

Makes 60 mini gingerbread men

NoEmptyChairs.me

For more wonderful Christmas cookie ideas, visit Food Blogga’s Eat Christmas Cookies Event. For submitting your own cookies to the event, visit Food Blogga.

3 Comments

Filed under Cookies

A Word of Gratitude

Today, on the biggest food day of the year, there will be no recipes and no amateurish pictures of the food that regularly graces our table. Instead, I just wanted to share a short (and very incomplete) list of some of things that I am most grateful for:

  • I am ever grateful to God, who has granted me life, and who blesses that life on a daily basis.
  • I am grateful for an amazing husband, who loves and supports me in all of my adventures, and who has never, in 20 years of marriage, uttered a single derogatory or demeaning comment to me. I love you Brian!
  • I am grateful for 5 wonderful children, who teach me far more than I could ever teach them.
  • I am grateful to be a full-time Mom. This has provided me more joy in my life than I could have ever imagined!
  • I am grateful, again, for a husband who works so hard so that I am able to be that full-time Mom.
  • I am grateful for the knowledge that families can be together forever, and that I will always be that full-time Mom.
  • I am grateful for the family that raised me and who continue to teach and support me. I have terrific parents and sisters that are a constant source of blessings to me.
  • I am grateful for a country where I am free to worship as I believe, participate in the democratic process, have opportunity to make my own way in the world, and the freedom to write a silly-little food blog.
  • I am grateful for the armed forces who established and maintain that freedom for me at the risk of their lives, and for very little reward. Extreme gratitude also to all of their families for their many sacrifices.
  • I am grateful for amazing friends who share daily in my joys and sorrows and are a constant source of strength.
  • I am grateful for the far-away friends that I have made across the seven states and four countries where I have lived, for long or short periods of time. You have helped to shape me into the person that I have become today.
  • I am grateful for the opportunity to serve others, because I always receive so much more in return.
  • I am grateful for the bounty of the earth that allows me to experiment and play with my food!

On this Thanksgiving day, I hope that your turkey is moist and your plates are full, and that you are surrounded by people that you love. Most of all, I hope that you have as much to be grateful for in your life as I do in mine. My best wishes for a gratitude-filled day of Thanks.

No Empty Chairs Signature2

1 Comment

Filed under Uncategorized

Cream of Broccoli Soup with Shredded Chicken or Turkey

DSC03409-2

What to do with leftover turkey on Friday? Try this warm, creamy, cheesy broccoli soup. Perfect for leftover roast chicken or turkey.

DSC03401-2

Cream of Broccoli Soup with Shredded Chicken

DSC03409-2

2 Tbs butter
1 large bunch broccoli, chopped
or 2 boxes frozen chopped broccoli
1 onion, chopped
3 cloves garlic, minced
4 cups chicken broth
3 cups cream
1 can broccoli cheese soup
1 tsp salt
1/8 tsp. white pepper
1-2 Tbs fresh chopped oregano or ½ tsp dried oregano
2 C cooked, diced chicken or turkey (or 2 cans chicken)
½ cup cheddar cheese
½ cup Parmesan cheese (fresh grated)

Sauté broccoli, onion and garlic in butter (If using frozen broccoli, sauté onion and garlic first until tender; then add thawed broccoli). Add chicken broth and cook until broccoli is crisp/tender. Puree half of mixture in blender. Return to pot. Stir in remaining ingredients and cook until hot and thickened (about 15 minutes). Garnish with additional cheese, if desired.

NoEmptyChairs.me

2 Comments

Filed under Main Dishes, Soups/Stews/Curries

Spicy Pan-Seared Tuna Steaks

DSC03832

These can actually be as spicy or not-so-spicy as your family likes. Fresh tuna steaks are marinated in a flavorful soy sauce based sauce and then quickly seared just before serving. Super easy. Super fast. Super delicious. Plus NO prep bowls to clean! Just one pan to clean and one Ziploc bag to throw away.

The marinade includes lime and soy sauce, ginger and garlic, chili paste (which can be adjusted to taste), and cilantro. Tuna is a drier fish, so the marinade also contains quite a lot of oil, but the marinade is drained off before cooking, so you don’t actually eat all of that oil. But it will keep your fish nice and moist. Tuna is best eaten on the rare side. It is so much more tender and flavorful that way. Nothing at all like dry tuna out of a can.

Marinate your fish in a Ziploc bag or shallow dish at room temperature for 30-40 minutes before you plan on eating (or prepare it earlier in the day and place in the refrigerator. Remove from fridge 30 minutes before you plan on cooking it).

This cooks very fast-only about 5 minutes total, so have your side dishes ready before you begin searing.

To cook, heat a skillet over medium-high to high heat. Don’t add any oil; the marinade has plenty of that! Remove fish from marinade, draining off as much of the marinade as possible.

DSC03819

Add tuna steaks to the hot pan and cook 3 minutes on the first side and 2 minutes on the second side.

You can cover the pan to reduce splattering, if you like. Tuna will be cooked about ¼” through, and rare in middle. Increase cooking time if you want it cooked a little more, but don’t overcook; it will quickly become dry.

DSC03825 .

.RECIPE:

Spicy Pan-Seared Tuna Steaks

DSC03832

4 tuna steaks (about 1 ½” thick)
Zest & Juice from one lime (or lemon)
3 cloves garlic, minced
2 tsp minced gingerroot
¼ cup soy sauce
1 tsp sugar (or low-carb sweetener)
¼ cup toasted sesame oil
¼ cup olive oil
1 tsp chili paste
¼ cup chopped fresh cilantro
¼ tsp salt
¼ tsp pepper

Combine all ingredients in a Ziploc bag. Marinate for 30 minutes at room temperature, or up to 2 hours in refrigerator (remove from fridge 30 minutes before cooking).

Heat pan on medium-high heat. Remove tuna from marinade. Add tuna steaks to pan and cook 3 minutes on one side and 2 minutes on the 2nd side (cover to reduce splattering). Tuna will be cooked about ¼” around, and rare in middle.

NoEmptyChairs.me

5 Comments

Filed under Main Dishes

Pumpkin Quiche and a Thai Winter Squash Soup

DSC03457

Fall vegetables and fruit have such wonderful deep colors! We recently purchased several bushels of squash, pumpkins, and apples and it has been fun finding ways to use them. As colder weather sets in I love roasting squash and making good hearty soups that taste and smell fabulous and warm up the house all at the same time. For dinner one night this weekend I roasted a bunch of squash and pumpkins and made a pumpkin quiche and a creamy winter squash soup with a subtle Thai flavor.

DSC03966

Pumpkin Quiche with Bacon & Asparagus

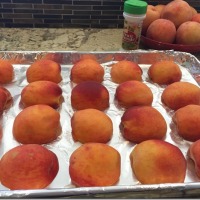
For the quiche, I used my standard quiche recipe, substituting one cup of mashed pumpkin for one cup of cream in the recipe. I used half of a small roasted sugar pumpkin (try roasting your own squash-it is wonderful!)

DSC03874

DSC03897 I used an immersion blender to mix the remaining cup of cream with the pumpkin and then added that to the egg and cheese mixture (I used Swiss and Parmesan), tossed in some cooked, crumbled bacon, sautéed onions and garlic, and chopped asparagus and baked it in a pie crust. DSC03909

The resulting quiche had only a very mild pumpkin flavor, but it had a wonderful texture and color.

.

.

.

DSC03923 .

This would be a great way to sneak extra veges into your family’s diet without them ever knowing! And it is so much healthier than the original recipe.

.

Next time I want to try this with a butternut squash, which has a slightly stronger taste and even more brilliant color!

.

.

DSC03959 Thai Winter Squash Soup

I loved this soup! I used four different varieties of winter squash for this: half of a small pumpkin, an acorn squash, a butternut squash and a delicata squash (the small yellow one with green stripes). Any combination of squash would work fine. In trying to come up with a recipe, I didn’t want an overly bland soup, but I also didn’t want to overpower the roasted squash flavor by using really strong flavors, or making it too spicy.

DSC03880 I started by roasting all of my squash and then coarsely chopping them (I took the lazy approach to chopping and scooped the cooked squash into a large 4 cup Pyrex measuring cup and then ran a knife through it to help pack down the squash to get a full 4 cups).

.

DSC03913 .

In a stockpot, sauté some onions and garlic in coconut oil or olive oil.

.

.

.

DSC03915 .

When they are soft, stir in the cooked, chopped squash and two chopped apples (they lend a nice sweetness to the soup).

.

.

Thin mixture by adding 2 cups of chicken broth, one can of coconut milk, and one cup of cream (for a wonderful richness). Cook until apples and squash are very soft. Use an immersion blender to create a smooth soup. Use can also use a blender, but you will have to work in batches. I added a mild Thai flavor to this soup by stirring in 2 tsp Thai red curry paste and 1 tsp fresh grated ginger. I also added a small amount of fresh thyme and some chopped Thai basil from our garden, now growing inside (chopped cilantro would also be great). Add additional chicken broth if soup is too thick.

DSC03959 We garnished this with some toasted pine nuts (sauté pine nuts in 1 Tbs coconut oil or butter until lightly browned).

RECIPES:

Pumpkin Quiche with Bacon & Asparagus

DSC03966

Unbaked Single Pie Crust
4 slices bacon
1 small onion, chopped
2 cloves garlic, minced
½ cup chopped asparagus
1 cup cooked, mashed pumpkin
1 cup heavy cream
4 eggs, lightly beaten
1 cup shredded Swiss cheese
½ cup shredded Parmesan cheese
½ tsp salt
¼ tsp pepper

Preheat oven to 425°F.

Chop bacon and cook until crisp. Remove from pan. Drain grease, reserving 1 Tbs of drippings in the pan. Sauté onion and garlic until softened, but not browned. Remove from heat. Stir in chopped asparagus. Cool slightly.

Mix mashed pumpkin and cream well (an immersion blender works great). Mix in eggs, cheeses, salt, and pepper. Stir in cooled bacon/vegetable mixture.

Pour into unbaked pie crust. Bake at 425°F for 15 minutes. Reduce heat to 350°F and bake for an additional 30 minutes, or until set. Cover edges of crust with foil or pie crust shield if they brown too quickly. Cool 10 minutes before slicing.

NoEmptyChairs.me

Thai Winter Squash Soup

DSC03959

2 Tbs coconut oil or butter
1 large onion, chopped
4 whole garlic cloves
4 cups cooked, mashed winter squash
(I used pumpkin, butternut, acorn and Delicata)
2 apples: peeled, cored and chopped
2 cups chicken broth
1 can coconut milk
1 cup heavy cream
1 ½ tsp salt (adjust to taste)
1/8 tsp ground coriander
2 tsp Thai red curry paste
1 tsp fresh minced ginger
1 tsp minced fresh thyme leaves
2 Tbs chopped fresh Thai basil (or chopped cilantro-I would use more of the cilantro, probably ¼ cup)
Toasted pine nuts

Heat coconut oil (or butter) in a stockpot. Sauté onion and garlic until soft. Add cooked squash and apples. Cook for 5 minutes. Stir in chicken broth and coconut milk and cook until apples are tender, about 10 minutes. (You could also use uncooked, diced squash and cook longer, until squash is very tender).

Blend soup to make a smooth puree (using an immersion blender or regular blender).

Add cream, salt, coriander, curry paste, ginger and thyme leaves. Cook 10-15 minutes, adding additional chicken broth if the soup is too thick.

Stir in Thai basil or cilantro just before serving.

Garnish with toasted pine nuts.

NoEmptyChairs.me

6 Comments

Filed under Breakfast/Brunch, Main Dishes, Soups/Stews/Curries

Dulce de Leche

DSC02455.jpg

**Below are six different ways to make Dulce de Leche. Click on the “METHOD” titles to go to the individual blog posts for more detailed instructions and pictures**

Dulce de Leche

DSC02455.jpg

STOVETOP METHOD:

Ingredients:

  • unopened cans of sweetened condensed milk

Preparation:

  1. Start with a large stockpot. Place a rack in the bottom of the pot (mine has a steamer insert that I used).
  2. Remove the labels from your sweetened condensed milk. Place unopened, label-free cans  into the bottom of your stockpot. You can use as many as will fit in one layer in your pot.
  3. Fill pot with room temperature tap water. Cover cans completely with water. The water level should be at least 2 inches above the cans.
  4. Cover the pot and bring to a boil. Reduce heat to a simmer. Cook, covered, for 3 hours.
    ***The water level must remain above the top of the cans. If not—this is when you end up cleaning caramel from exploding cans off of the top of your ceiling and every surface beneath it*** To ensure that you don’t forget that you are cooking when you go off and start another project, set a timer for 30 minutes. Check water level (add more boiling water, if necessary), then set the timer again for another 30 minutes. Continue setting the timer in 30 minute increments until the 3 hours are up.
  5. Remove pan from heat, remove lid, and let water cool for 30-60 minutes before removing cans.
  6. Unopened cans can be stored on a pantry shelf (use a marker to label cans). Opened cans need to be refrigerated.

CROCKPOT METHOD:

Ingredients:

  • Unopened cans of sweetened condensed milk

Preparation:

  1. Remove labels from sweetened condensed milk cans. Do not open cans.
  2. Place cans in the bottom of a crock pot.
  3. Cover cans completely with room temperature water. **Be sure that water completely covers cans**
  4. Place the lid on the crock pot and cook on low heat for 8 hours. (The water level in my crock pot stayed the same for the entire cooking time, so there was no need to add additional water.)
  5. Turn off crock pot, remove lid and let water cool 30-60 minutes before removing cans.
  6. Unopened cans can be stored on a pantry shelf (use a marker to label cans). Opened cans need to be refrigerated.

OVEN METHOD:

Ingredients:

  • One can of sweetened condensed milk

Preparation:

  1. Preheat oven to 425°F.
  2. Pour one can of sweetened condensed milk into a glass pie plate. Cover the pie plate securely with foil.
  3. Place foil-covered pie plate in a larger baking pan. (I used the bottom half of a broiler pan.)
  4. Place the pans on an oven rack and add hot water until it reaches the halfway mark of the pie plate.
  5. Bake for 60-90 minutes, adding more water if necessary

DOUBLE BOILER METHOD:

Ingredients:

  • One can of sweetened condensed milk

Preparation:

  1. Pour one can of sweetened condensed milk into the top of a double boiler.
  2. Fill the bottom of the double boiler with water and bring to a boil.
  3. Cover pan and cook over low heat for 50-60 minutes (or longer to get desired consistency).
  4. Stir mixture occasionally, until thick and caramel-colored.

PRESSURE CANNER METHOD:

Ingredients:

  • Cans of sweetened condensed milk

Preparation:

  1. Wash canning jars (a quick run through the dishwasher is a good way to sanitize them). Place new canning lids in a small pan of very hot water (bring water to a boil, then remove from heat and add lids).
  2. Open sweetened condensed milk cans and pour into canning jars, leaving 1/2” headspace. (Try not to lick the remaining sweet milk off of the can lids now-you don’t want to incorporate any germs into the jars. There will be plenty of time for licking when the jars are processing.)
  3. Wipe rims and edges of jars with a damp cloth to remove any milk that dribbled.
  4. Place lids and rings on jars.
  5. Place filled jars on a rack in a pressure canner (YOU MUST USE A PRESSURE CANNER, NOT A BOILING BATH CANNER). Add 3 quarts of room temperature water. DO NOT BRING WATER TO A BOIL BEFORE ADDING JARS. Since you are not doing a “hot pack” (hot jars; hot filling; hot water), the jars WILL break if you place them directly into boiling water. Then you end up with a very large pot full of sticky, sugar milk/water. Leaving you to clean all of the other jars and the pot and start over. Not fun.
  6. Place the lid on the pressure canner and bring the water to a boil over high heat.
  7. After you have a steady steam flow through the vent pipe for 10 minutes, place the pressure regulator on the vent pipe.
  8. Continue to cook on high until pressure reaches 15 lb.
  9. Lower heat to maintain a constant 15 lb pressure. Keep an eye on the pressure gauge and adjust heat to maintain 15 lb of pressure. Cook for 20 minutes at 15 lb pressure. I used both pint and half-pint jars, and they both came out the same after 20 minutes.
  10. Turn off stove and remove pressure canner from heat. DO NOT OPEN. Let the pressure drop until the air vent/cover lock has completely dropped and no steam escapes when the pressure regulator is tilted (this took about 30 minutes for mine).
  11. When pressure is completely reduced, remove pressure regulator and open canner. Remove jars and set on the countertop on a clean towel.
  12. Let sit for 24 hours. Check seal. Refrigerate for added food safety.

HOMEMADE METHOD
(Adapted from Alton Brown):

Ingredients:

  • 4 cups (1 quart) whole milk
  • 1 ½ cups granulated sugar
  • ½ tsp baking soda
  • 1 vanilla bean, split

Preparation:

  1. Combine the milk and sugar in a heavy saucepan.
  2. Bring to a boil over medium heat. Do not stir.
  3. Remove from heat and use a skimmer to remove foam (a spoon or small ladle will work if you don’t have a skimmer).
  4. Add baking soda and split (but not scraped) vanilla bean to the pan.
  5. Cook, uncovered, over low heat for one hour, stirring often and skimming foam as necessary.
  6. Remove vanilla bean and continue to cook, stirring constantly, until mixture reaches desired thickness.  This will take about 60 minutes, depending on how thick you want your caramel. It will burn easily at this point, so be attentive!
  7. The dulce de leche is close to done when a spoon dragged through the mixture leaves a trail. It will thicken a lot as it cools. Test for consistency by dropping a small spoonful into a cup of ice water, or by placing a few drops on a plate that has been placed in the freezer.
  8. The original recipe calls for straining through a fine mesh strainer, but I skipped this step and it was still nice and smooth.

NoEmptyChairs.me

Leave a comment

Filed under Candy, Desserts, Tips and Tutorials