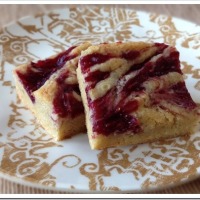
Category Archives: Candy

Twelve Days of Christmas Cookies: Nanaimo Bars

100711 006-1DAY 6: Nanaimo Bars

Nanaimo is a little town on Vancouver Island in British Columbia, Canada. It is where my dear husband spent the first half of his childhood. These bars have a controversial history all their own, but Canadians are ever true to these bars originating in their little seaside town. More info and the recipe officially adopted by Nanaimo can be found on the Nanaimo city website.

These bars are definitely more like a candy than cookie. If you remember that before you take a great big bite, they will not seem so outrageously sweet. Think  “double frosted fudge”  not “brownie”  and you will take appropriate nibbles that will keep your blood sugar in check.

RECIPE:

Nanaimo Bars

100711 007-1

Bottom Layer
½ cup butter (European style cultured)
¼ cup sugar
5 Tbs cocoa
1 egg beaten
1 tsp vanilla
1 ¼ cups graham cracker crumbs
½ cup finely chopped almonds
1 cup shredded coconut

Melt first 3 ingredients in top of double boiler. Add egg and stir to cook and thicken. Remove from heat. Stir in graham cracker crumbs, almonds and coconut. Press firmly into a buttered 8″ x 8″ pan.

Middle Layer
½ cup unsalted butter
2 Tbs plus 2 tsp cream
2 Tbs vanilla custard powder (Birds’ Custard Powder)
½ tsp vanilla
2 cups icing sugar

Cream butter, cream, custard powder, and icing sugar together well. Beat until light. Spread over bottom layer.

Top Layer
4 squares semi-sweet chocolate (1 oz. each)
2 Tbs unsalted butter

Melt chocolate and butter over low heat. Cool. Once cool, but still liquid, pour over middle layer and chill in refrigerator until firm.  Cut into small squares.

Recipe from the City of Nanaimo website

NoEmptyChairs.me

7 Comments

Filed under Candy, Cookies, Desserts

Twelve Days of Christmas Cookies: Chocolate Covered Pretzels

12-12-10 014-1

DAY 5: Chocolate Covered Pretzels

It is usually the simplest treats that are my kids’ favorites. These chocolate covered pretzels definitely fall into that category. They are easy to make, and fun for kids to help with. Adding the sprinkles is a coveted job in our kitchen.

For easy dipping, pour melted chocolate into a tall narrow container, like a drinking glass, wide mouthed canning jar, or a Pyrex measuring cup.  For easy cleanup, line your glass or jar with a Ziploc bag. Fold the top edge of the bag back over the lip of the glass. When you are done, just throw the bag away: no scrubbing chocolate out of the glass.

RECIPE:

Chocolate Covered Pretzels

12-12-10 013-1

Pretzel Rods
Dipping chocolate: dark, white, and/or colored
Variety of sprinkles

Melt chocolates using a double boiler (or melt slowly in the microwave). For easy dipping, pour chocolate into a tall narrow container, like a drinking glass, wide mouthed canning jar, or a Pyrex measuring cup. (For easy cleanup, line your glass or jar with a Ziploc bag. Fold the top edge of the bag back over the lip of the cup) Use a spoon, if needed to coat about 2/3 of the pretzel rod with the chocolate.

Place dipped pretzel on a sheet of waxed paper. Drizzle with contrasting colors of chocolate, if desired (for easy drizzling, use a squeeze bottle, or a Ziploc bag with a hole poked in one corner). While chocolate is still wet, garnish with sprinkles. Let dry completely before storing.

NoEmptyChairs.me

1 Comment

Filed under Candy, Desserts

2010 Twelve (More) Days of Christmas Cookies Recap

Here is a recap of our Second Annual Twelve Days of Christmas Cookies. For me, I am off to the gym to try and burn off a few of these calories.

Happy Baking!

DAY 1: Raspberry Crumb Bars

8-15-10 (58)-2

DAY 2: Pumpkin Snickerdoodles

101510 049-1

DAY 3: Chocolate Nutella Cookies

101510 036-3

DAY 4: Glazed Lemon Poppy Seed Cookies

050810 005-1

DAY 5: Almond Macaroon Brownies

091110 013-1

DAY 6: Trail Mix Cookies

112210 015-1

DAY 7: Cream Cheese Cut-Out Cookies

8-15-10 (49)-1

DAY 8: Chocolate Revel Bars

091110 030-1

DAY 9: Chocolate Peanut Butter Swirl Cookies

12-1-10 044-1

DAY 10: Caramel Pecan Bars

12-4-10 021-1

DAY 11: Turtle Pretzel Snaps

12-1-10 029-1

DAY 12: Coconut Macaroons

12-4-10 016-1


4 Comments

Filed under Candy, Cookies, Desserts

Twelve (More) Days of Christmas Cookies: Old-Fashioned Coconut Macaroons

12-4-10 034-1

DAY 12: For our final Christmas cookie this season, a traditional coconut macaroon. This is a flourless, gluten-free cookie made from coconut, egg whites, sugar, and almond extract. They can be made sugar-free as well by using unsweetened coconut and a sugar substitute. The ones pictured here are the full-sugar variety.

The “dough” is cooked on the stove prior to baking, which leaves you with a wonderful chewy macaroon on the inside and slightly crispy toasted coconut on the outside. Dipping the bottoms in chocolate is optional, but I definitely recommend it.

12-4-10 008-1

12-4-10 016-1

RECIPE:

Coconut Macaroons

12-4-10 034-1

1 (14 oz) pkg flaked sweetened coconut
6 egg whites
1 cup sugar
¼ tsp salt
2 tsp almond extract
1 cup semi-sweet or bittersweet chocolate chips, melted (optional)

Preheat oven to 325°F.

In a medium saucepan, stir together coconut, egg whites, sugar, and salt. Cook over medium heat for 10 minutes, stirring constantly (a spoon drawn through the mixture should leave a clean path). Remove from heat; stir in almond extract.

Drop onto greased cookie sheets (or line with a Silpat) by rounded teaspoonfuls. Let stand on cookie sheets for 15 minutes before baking. Bake for 18-20 minutes, until lightly browned. Cool on pan for 2 minutes before removing to wire rack. Cool completely.

Dip bottoms of macaroons in melted chocolate, if desired. Place on waxed paper until chocolate has hardened.

Makes about 4 dozen cookies

NoEmptyChairs.me

TWELVE DAYS OF CHRISTMAS COOKIES (2010) RECAP:
DAY 1: Raspberry Crumb Bars
DAY 2: Pumpkin Snickerdoodles
DAY 3: Chocolate Nutella Cookies
DAY 4: Glazed Lemon Poppy Seed Cookies
DAY 5: Almond Macaroon Brownies
DAY 6: Trail Mix Cookies
DAY 7: Cream Cheese Cut-Out Cookies
DAY 8: Chocolate Revel Bars
DAY 9: Chocolate Peanut Butter Swirl Cookies
DAY 10: Caramel Pecan Bars
DAY 11: Turtle Pretzel Snaps

5 Comments

Filed under Candy, Cookies, Desserts

Twelve (More) Days of Christmas Cookies: Turtle Pretzel Snaps

12-1-10 029-1

DAY 11: Technically, these are a candy, not a cookie, but they still make a great addition to any holiday cookie tray. Sweet & salty; crunch & chewy. A great combination of tastes and textures.

These candies are a simple, fun alternative to traditional Turtle Candies. They are also an easy treat to make with kids. They can do almost all of the work themselves.

The base of these treats is a Pretzel Snap: the square criss-crossed shaped pretzels that look kind of like a window pane. Place the pretzels in a single layer on a lined baking sheet. You can use a Silpat, parchment paper or foil to line the pan. Top each pretzel with half of a caramel. Instead of a caramel, you can also use a Rolo candy. I prefer the flavor of the plain caramel, topped with a bittersweet chocolate chip. Using plain caramels also allows me to make some “chocolate free” candies for Little A. But the Rolos do save you one step.

12-1-10 003-1Bake the caramel topped pretzels for about 5-7 minutes, until caramels (or Rolos) are soft. Remove from oven and immediately top with a chocolate chip.  I like the Ghirardelli bittersweet chips, for both the flavor and the fact that they are slightly bigger than normal semi-sweet chocolate chips. (If you are using Rolos, you don’t need to use any chocolate chips) The chocolate will melt by the time you have finished putting one on each caramel. Press one M&M or toasted pecan half into the soft chocolate. Let candies cool completely before moving from baking sheet. 12-1-10 014-1

RECIPE:

Turtle Pretzel Snaps

12-1-10 029-1

Pretzel Snaps (criss-cross shaped)
Caramels or Rolos
Chocolate chips (if using plain caramels); I like the larger Ghirardelli bittersweet chips
Peanut M&Ms
Whole Pecans, toasted (optional)

Preheat oven to 350°F.

Lay pretzel snaps in a single layer on a baking sheet lined with a Silpat, parchment paper or foil. Cut caramels in half and place one half on each pretzel (Alternately, top each pretzel with a Rolo candy). Bake for 5-7 minutes, or until caramels are soft. Remove from oven and immediately top each caramel with one chocolate chip (omit chocolate chips when using Rolos). When chocolate is soft, press an M&M or pecan half into the chocolate. Let chocolate harden before moving to a serving plate.

NoEmptyChairs.me

TWELVE DAYS OF CHRISTMAS COOKIES (2010) RECAP:
DAY 1: Raspberry Crumb Bars
DAY 2: Pumpkin Snickerdoodles
DAY 3: Chocolate Nutella Cookies
DAY 4: Glazed Lemon Poppy Seed Cookies
DAY 5: Almond Macaroon Brownies
DAY 6: Trail Mix Cookies
DAY 7: Cream Cheese Cut-Out Cookies
DAY 8: Chocolate Revel Bars
DAY 9: Chocolate Peanut Butter Swirl Cookies
DAY 10: Caramel Pecan Bars

3 Comments

Filed under Candy, Cookies, Desserts

Dulce de Leche

DSC02455.jpg

**Below are six different ways to make Dulce de Leche. Click on the “METHOD” titles to go to the individual blog posts for more detailed instructions and pictures**

Dulce de Leche

DSC02455.jpg

STOVETOP METHOD:

Ingredients:

  • unopened cans of sweetened condensed milk

Preparation:

  1. Start with a large stockpot. Place a rack in the bottom of the pot (mine has a steamer insert that I used).
  2. Remove the labels from your sweetened condensed milk. Place unopened, label-free cans  into the bottom of your stockpot. You can use as many as will fit in one layer in your pot.
  3. Fill pot with room temperature tap water. Cover cans completely with water. The water level should be at least 2 inches above the cans.
  4. Cover the pot and bring to a boil. Reduce heat to a simmer. Cook, covered, for 3 hours.
    ***The water level must remain above the top of the cans. If not—this is when you end up cleaning caramel from exploding cans off of the top of your ceiling and every surface beneath it*** To ensure that you don’t forget that you are cooking when you go off and start another project, set a timer for 30 minutes. Check water level (add more boiling water, if necessary), then set the timer again for another 30 minutes. Continue setting the timer in 30 minute increments until the 3 hours are up.
  5. Remove pan from heat, remove lid, and let water cool for 30-60 minutes before removing cans.
  6. Unopened cans can be stored on a pantry shelf (use a marker to label cans). Opened cans need to be refrigerated.

CROCKPOT METHOD:

Ingredients:

  • Unopened cans of sweetened condensed milk

Preparation:

  1. Remove labels from sweetened condensed milk cans. Do not open cans.
  2. Place cans in the bottom of a crock pot.
  3. Cover cans completely with room temperature water. **Be sure that water completely covers cans**
  4. Place the lid on the crock pot and cook on low heat for 8 hours. (The water level in my crock pot stayed the same for the entire cooking time, so there was no need to add additional water.)
  5. Turn off crock pot, remove lid and let water cool 30-60 minutes before removing cans.
  6. Unopened cans can be stored on a pantry shelf (use a marker to label cans). Opened cans need to be refrigerated.

OVEN METHOD:

Ingredients:

  • One can of sweetened condensed milk

Preparation:

  1. Preheat oven to 425°F.
  2. Pour one can of sweetened condensed milk into a glass pie plate. Cover the pie plate securely with foil.
  3. Place foil-covered pie plate in a larger baking pan. (I used the bottom half of a broiler pan.)
  4. Place the pans on an oven rack and add hot water until it reaches the halfway mark of the pie plate.
  5. Bake for 60-90 minutes, adding more water if necessary

DOUBLE BOILER METHOD:

Ingredients:

  • One can of sweetened condensed milk

Preparation:

  1. Pour one can of sweetened condensed milk into the top of a double boiler.
  2. Fill the bottom of the double boiler with water and bring to a boil.
  3. Cover pan and cook over low heat for 50-60 minutes (or longer to get desired consistency).
  4. Stir mixture occasionally, until thick and caramel-colored.

PRESSURE CANNER METHOD:

Ingredients:

  • Cans of sweetened condensed milk

Preparation:

  1. Wash canning jars (a quick run through the dishwasher is a good way to sanitize them). Place new canning lids in a small pan of very hot water (bring water to a boil, then remove from heat and add lids).
  2. Open sweetened condensed milk cans and pour into canning jars, leaving 1/2” headspace. (Try not to lick the remaining sweet milk off of the can lids now-you don’t want to incorporate any germs into the jars. There will be plenty of time for licking when the jars are processing.)
  3. Wipe rims and edges of jars with a damp cloth to remove any milk that dribbled.
  4. Place lids and rings on jars.
  5. Place filled jars on a rack in a pressure canner (YOU MUST USE A PRESSURE CANNER, NOT A BOILING BATH CANNER). Add 3 quarts of room temperature water. DO NOT BRING WATER TO A BOIL BEFORE ADDING JARS. Since you are not doing a “hot pack” (hot jars; hot filling; hot water), the jars WILL break if you place them directly into boiling water. Then you end up with a very large pot full of sticky, sugar milk/water. Leaving you to clean all of the other jars and the pot and start over. Not fun.
  6. Place the lid on the pressure canner and bring the water to a boil over high heat.
  7. After you have a steady steam flow through the vent pipe for 10 minutes, place the pressure regulator on the vent pipe.
  8. Continue to cook on high until pressure reaches 15 lb.
  9. Lower heat to maintain a constant 15 lb pressure. Keep an eye on the pressure gauge and adjust heat to maintain 15 lb of pressure. Cook for 20 minutes at 15 lb pressure. I used both pint and half-pint jars, and they both came out the same after 20 minutes.
  10. Turn off stove and remove pressure canner from heat. DO NOT OPEN. Let the pressure drop until the air vent/cover lock has completely dropped and no steam escapes when the pressure regulator is tilted (this took about 30 minutes for mine).
  11. When pressure is completely reduced, remove pressure regulator and open canner. Remove jars and set on the countertop on a clean towel.
  12. Let sit for 24 hours. Check seal. Refrigerate for added food safety.

HOMEMADE METHOD
(Adapted from Alton Brown):

Ingredients:

  • 4 cups (1 quart) whole milk
  • 1 ½ cups granulated sugar
  • ½ tsp baking soda
  • 1 vanilla bean, split

Preparation:

  1. Combine the milk and sugar in a heavy saucepan.
  2. Bring to a boil over medium heat. Do not stir.
  3. Remove from heat and use a skimmer to remove foam (a spoon or small ladle will work if you don’t have a skimmer).
  4. Add baking soda and split (but not scraped) vanilla bean to the pan.
  5. Cook, uncovered, over low heat for one hour, stirring often and skimming foam as necessary.
  6. Remove vanilla bean and continue to cook, stirring constantly, until mixture reaches desired thickness.  This will take about 60 minutes, depending on how thick you want your caramel. It will burn easily at this point, so be attentive!
  7. The dulce de leche is close to done when a spoon dragged through the mixture leaves a trail. It will thicken a lot as it cools. Test for consistency by dropping a small spoonful into a cup of ice water, or by placing a few drops on a plate that has been placed in the freezer.
  8. The original recipe calls for straining through a fine mesh strainer, but I skipped this step and it was still nice and smooth.

NoEmptyChairs.me

Leave a comment

Filed under Candy, Desserts, Tips and Tutorials