Last week was my Middle K’s 13th birthday! While she is technically the “middle child”, she is in the unique position to play, as it suits her, the role of oldest, middle or youngest child.
In terms of birth order, you can’t get much more middle than our Middle K. The third of five children, with both a younger and older brother, and a younger and older sister. But as there is a five-year age gap between Middle K and Little A, she spent a fair amount of time as the “baby” of the family. This age gap often divides our family when it comes to activities: the “big kids” and the “little kids” (think amusement parks here). So in these settings, she fills that youngest child role. But at home, she has really stepped into the “oldest child” role with respect to the little ones. She is the one they come to when they want to play, and she is often the one to help them and put them to bed when Brian and I are out.
I guess it is in her adaptability that her strength as a middle child really shines. What a blessing to our family.

If only she would look at a camera willingly!
Middle K loves to cook, as long as it is something sweet, and she has been on a real chocolate and peanut butter kick lately. Here are some of her most recent endeavors:
Peanutty Buckeye Bars

Peanut Butter Heart Kisses

These Hershey’s Bliss chocolates make a great alternative to traditional Kisses.

Some of the peanut butter cookies were left “heartless”, for our chocolate-adverse Little A.
 —
—
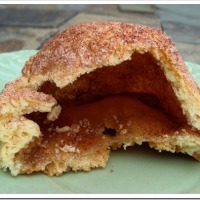
Chocolate Peanut Butter Buckeyes
 (Traditional Buckeyes will have some of the peanut butter middle showing at the top like an “eye”, but Middle K was in this for speed and volume, not appearance)
—
—
RECIPES:
Peanutty Buckeye Bars

1 (19.5-oz) package brownie mix
2 eggs
1/3 cup oil
1 cup chopped peanuts
1 14-oz can sweetened condensed milk
½ cup creamy peanut butter
Preheat oven to 350°F. Lightly grease a 9×13” baking pan.
In a large bowl, combine the brownie mix, eggs, and oil. Beat with an electric mixer on medium speed until combined. Stir in peanuts.
Remove about one-third of the brownie batter and set aside. Spread the remaining two-thirds of the brownie batter evenly into prepared pan.
In a medium bowl, whisk together sweetened condensed milk and peanut butter until smooth. Spread evenly over brownie mixture in pan. Separate the remaining brownie mixture into pieces, flatten them with your fingers (you want them to be pretty thin), and lay them on top of the peanut butter layer. Do not completely cover the peanut butter layer.
Bake for 25 to 30 minutes or until top is set and edges are lightly browned. Cool completely in pan on a wire rack. Cut into bars.
Makes 18-24 bars.
From Better Homes and Gardens
NoEmptyChairs.me
Peanut Butter Heart Kisses
—
½ cup butter
½ cup coconut oil or additional butter
1 cup creamy peanut butter
1 cup sugar
1 cup brown sugar
2 eggs
1 tsp vanilla
3 cups flour
1 ½ tsp baking soda
1 tsp baking powder
Hershey’s Bliss Chocolate Hearts (or Dove Hearts or other “shaped” chocolate)
Preheat oven to 350°F.
Cream butter, coconut oil (if using), peanut butter and sugars. Beat in vanilla and eggs. Add dry ingredients. Roll dough into balls. Place on an ungreased cookie sheet.
Bake at 350°F for 8-10 minutes. Immediately press 1 chocolate heart into each cookie; cool on a wire rack.
NoEmptyChairs.me
Chocolate Peanut Butter Buckeyes
—
1 ½ cups creamy peanut butter
½ cup butter, softened
1 tsp vanilla extract
4 cups powdered sugar, sifted
2 cups chocolate chips (semi-sweet or bittersweet)
2 Tbs shortening
In a large bowl, mix peanut butter, butter, vanilla, and powdered sugar. (This will be a stiff dough; hands work best for mixing)
Shape dough into balls. (If the dough is too sticky to work with, refrigerate for about 20 minutes before rolling into balls) Place on a waxed paper lined baking sheet or cutting board. Refrigerate for about 30 minutes.
Using a double boiler, melt chocolate and shortening. Alternately, melt chocolate and shortening in the microwave (for 30 seconds at a time, stirring after each time).
Use a toothpick to dip balls into warm, melted chocolate. Leave an “eye” shape at the top by not completely dipping peanut butter ball. Return coated balls to the waxed paper lined pan.
Refrigerate to set.
Makes 3-4 dozen
NoEmptyChairs.me


 This filling is a standard ricotta manicotti filling, thick and cheesy, but I also love it mixed with spinach or other sautéed vegetables.
 Stuff your peppers or pasta shells with the cheese mixture and place in a baking dish.
 Top with sauce– a jarred marinara sauce or homemade spaghetti sauce works great—and bake, covered, for about 45 minutes at 350°F.
 After it is cooked through, I like to top it with a little extra cheese and pop it back in the oven for about 5 minutes.