Tag Archives: baking

Twelve Days of Christmas Cookies: Nanaimo Bars

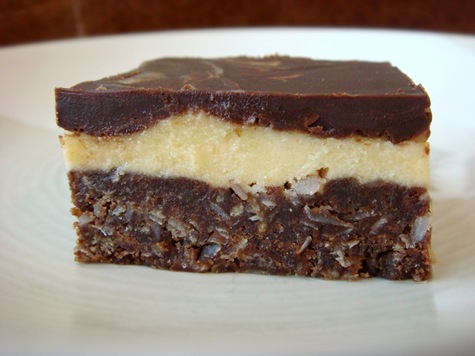
100711 006-1DAY 6: Nanaimo Bars

Nanaimo is a little town on Vancouver Island in British Columbia, Canada. It is where my dear husband spent the first half of his childhood. These bars have a controversial history all their own, but Canadians are ever true to these bars originating in their little seaside town. More info and the recipe officially adopted by Nanaimo can be found on the Nanaimo city website.

These bars are definitely more like a candy than cookie. If you remember that before you take a great big bite, they will not seem so outrageously sweet. Think  “double frosted fudge”  not “brownie”  and you will take appropriate nibbles that will keep your blood sugar in check.

—

RECIPE:

Nanaimo Bars
100711 007-1

Bottom Layer
½ cup butter (European style cultured)
¼ cup sugar
5 Tbs cocoa
1 egg beaten
1 tsp vanilla
1 ¼ cups graham cracker crumbs
½ cup finely chopped almonds
1 cup shredded coconut

Melt first 3 ingredients in top of double boiler. Add egg and stir to cook and thicken. Remove from heat. Stir in graham cracker crumbs, almonds and coconut. Press firmly into a buttered 8″ x 8″ pan.

Middle Layer
½ cup unsalted butter
2 Tbs plus 2 tsp cream
2 Tbs vanilla custard powder (Birds’ Custard Powder)
½ tsp vanilla
2 cups icing sugar

Cream butter, cream, custard powder, and icing sugar together well. Beat until light. Spread over bottom layer.

Top Layer
4 squares semi-sweet chocolate (1 oz. each)
2 Tbs unsalted butter

Melt chocolate and butter over low heat. Cool. Once cool, but still liquid, pour over middle layer and chill in refrigerator until firm.  Cut into small squares.

Recipe from the City of Nanaimo website

NoEmptyChairs.me
7 Comments

Filed under Candy, Cookies, Desserts

Twelve Days of Christmas Cookies: Chinese Almond Cookies

042611 093-1

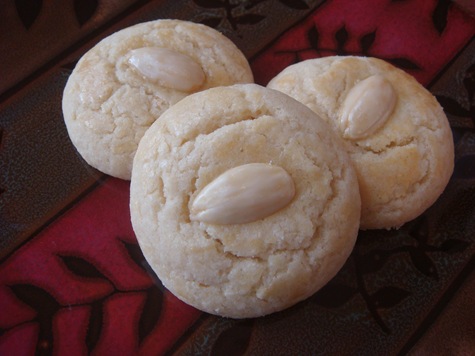
DAY 4: Chinese Almond Cookies

A soft, delicious cookie especially for the almond lover (that’s me!). The dough contains almond meal (ground almonds) and is flavored with almond extract. The cookies are then topped with blanched almonds before baking. A quick egg wash over the cookies gives them a great shine when they are cooked.

Can’t find blanched almonds at your store? Or don’t want to pay so much for such a tiny bag? Then blanch your own! All you need is raw almonds. The process is very easy: Boil them (1 minute), cool them (1 minute), squeeze off the skin. For a quick tutorial, click here: How To. . . Blanch Almonds

—

RECIPE:

Chinese Almond Cookies

042611 093-1

3 cups  flour
1 tsp baking soda
½ tsp salt
½ cup almond flour (finely ground blanched almonds)
1 ½ cups (3 sticks) butter, softened
1 cup sugar
1 egg
2 Tbs water
1 ½ tsp almond extract
42-48 whole almonds, blanched
Egg Wash: 1 whole egg, beaten and mixed with 1 tsp water

Preheat oven to 350°F.

Mix together the flour, baking soda, salt, and ground almonds. Set aside. With a mixer, beat the butter and sugar together until fluffy. Add the egg, water, and almond extract and mix well. Beat in the dry ingredients until just combined. Roll dough in your hands to make 1-inch balls. Place 1-2 inches apart on a parchment-lined baking sheet (or use a silicon baking mat). Press a blanched almond into the top of each dough ball. Using a pastry brush, brush the top of each cookie with the egg wash. Bake for 14-15 minutes.

Makes  42-48 small cookies.

To Blanch Almonds:

Bring a saucepan of water to a boil. Remove from heat. Add raw almonds to the hot water. Let sit for 1 minute (not longer). Drain and pour into a bowl of ice cold water. Let set in the water until cool (about 1 minute) Drain. Pinch almonds between your thumb and index finger to slide the almond out of its skin. Pat dry. Allow to dry completely before using in recipes.

If you oversoak your almonds and they don’t dry properly: preheat oven to 200°F. Turn oven OFF. Place almonds on a baking sheet and put into the warm (but OFF) oven. Leave almonds in the oven for 15-20 minutes.

Recipe adapted from Cooking for Engineers

NoEmptyChairs.me

Leave a comment

Filed under Cookies, Desserts

Twelve Days of Christmas Cookies: Cherry Shortbread Squares

11211-1

DAY 3: Cherry Shortbread Squares

These shortbread squares are light and tender, not hard and crumbly; almost more like a short little cake than a cookie, but firm enough to hold in your hand to eat.

The batter mixes together quickly, and is then spread onto a baking sheet. Use a toothpick to lightly score the batter into 24 squares. The lines will disappear as the cookies bake, but they make it easier to know where to place your cherries. The cherry topping is simply cherry pie filling-I used some that I canned this summer from tart cherries, but any variety of canned pie filling will work. Place about 3 cherries in the center of each square. As the cookies bake, the pie filling will sink about halfway into the batter. Little A loves these cookies: they are light and slightly lemony, and not a hint of chocolate.

1-11-11 003-1

And if you are really  lucky  talented, you will get some cookies that bear a striking resemblance to Mickey Mouse:1-11-11 001-1

RECIPE:

Cherry Shortbread Squares

11211-1

1 cup (2 sticks) unsalted butter, at room temperature
1 ½ cups sugar
½ teaspoon lemon extract (or 1 Tbs lemon juice)
1 tsp lemon zest
1 tsp pure vanilla extract
½ tsp salt
4 eggs
2 cups all-purpose flour
1 can cherry pie filling or berry pie filling
Powdered sugar, for dusting

Preheat oven to 350°F. Grease and flour a half-sheet pan (about 12×17 inches) with a 1-inch rim, or spray it with baking cooking spray (with flour).

In the bowl of an electric mixer, beat together the butter and sugar until very light and fluffy, about 2 minutes. Beat in the lemon extract, lemon zest, vanilla, and salt. Beat in the eggs one at a time. Scrape down the bowl. On the lowest speed, stir in the flour until just barely mixed.

Spread the batter onto the sheet pan and smooth it into an even layer. Score the batter into 24-30 squares with a toothpick (don’t worry about perfectly even squares as the lines will disappear during baking; it just makes placing the cherries easier). Place 3 cherries in the center of each square.

Bake for 20-25 minutes, or until a toothpick comes out clean. Cool completely in the pan on a wire rack. Just before serving, cut into 24 squares and dust lightly with powdered sugar.

Makes 24 3-inch squares

Recipe from Piece of Cake

NoEmptyChairs.me
1 Comment

Filed under Cookies, Desserts

Twelve Days of Christmas Cookies: Christmas Cherry Cookies

12-23-10 061-1

DAY 1: Welcome to the Third Annual Twelve Days of Christmas Cookies: Twelve days of cookies and treats that are perfect for sharing with family and friends.

12-23-10 047-1

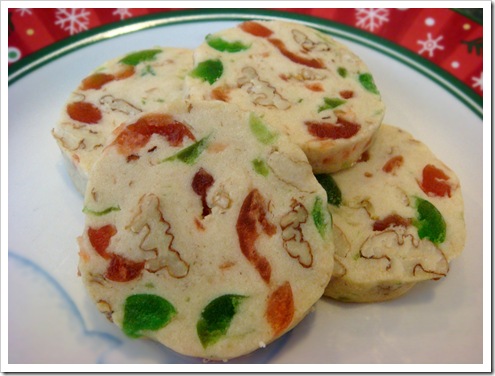
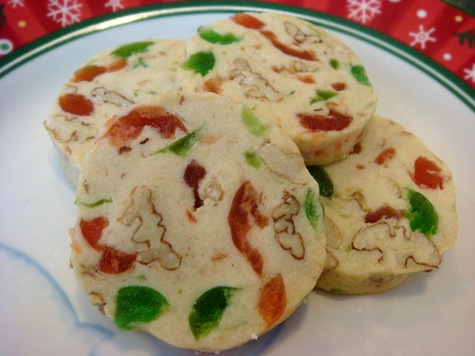
The first cookie up this year is an easy-to-make dough full of the colors of Christmas. These cookies were always on Mom’s list of treats to bake for Christmas when I was a kid.

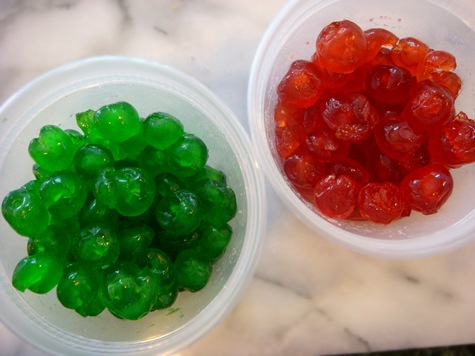
The dough is a shortbread dough that is filled with red and green candied cherries and pecans.

12-23-10 033-1

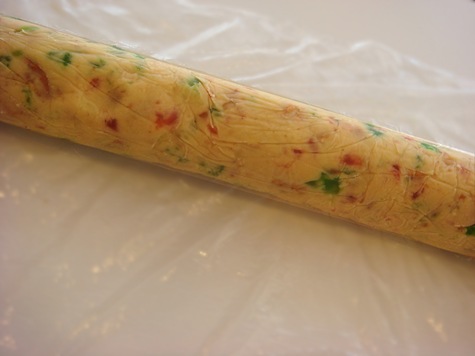
Roll the dough into a log and it can be stored in the fridge or freezer until you are ready to bake.

12-23-10 043-1

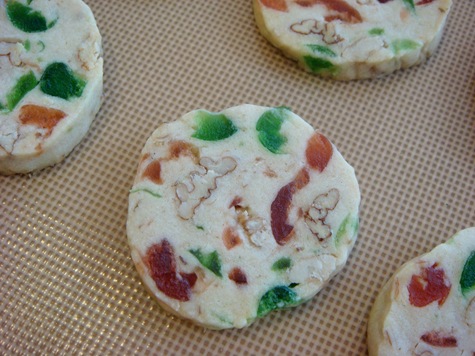
Use a sharp knife to slice dough into rounds that are about 3/8” thick.

12-23-10 053-1

For Twenty-Four more cookie ideas, click the links below for the two previous Christmas Cookie events:

First Annual Twelve Days of Christmas Cookies

Second Annual Twelve Days of Christmas Cookies

—

RECIPE:

Christmas Cherry Cookies

12-23-10 061-1

1 cup butter
1 cup powdered sugar
1 egg
1 tsp vanilla
2 ½ cups flour
1 cup pecan halves
2 cups red and green candied cherries, halved

Preheat oven to 325°F.

Cream butter and sugar; blend in egg and vanilla. Stir in flour; add pecans and cherries. Chill dough for 1-2 hours. Shape into logs with about 2” diameter. Roll in waxed paper or plastic wrap. Chill 3 hours. Cut into slices about 3/8” thick and bake for 13-15 minutes. Do not let cookies brown.

Makes about 4 dozen cookies

NoEmptyChairs.me

19 Comments

Filed under Cookies, Desserts

Chocolate Peanut Butter Mousse Cake

Chocolate and Penut Butter Mousse 033-1
Another fabulous cake from up-and-coming-baker Big A.

Chocolate and Penut Butter Mousse 005-1

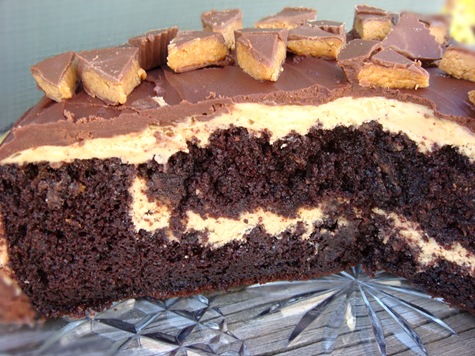
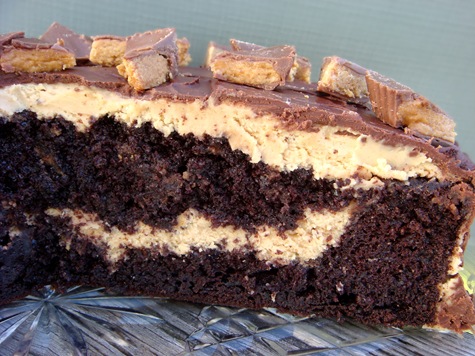
Big A made this cake from the cookbook Chocolate Cakes that she received from a friend for Christmas last year. They did provide a recipe for the chocolate cake, but Big A started with a chocolate fudge cake mix, then made the rest of the cake from scratch. The cake batter has peanut butter cups mixed in (good thing for leftover Halloween candy), and is baked as a one-layer cake.

The top center of the cake is scooped out to create a crater, filled with peanut butter mousse and then the  removed cake pieces are replaced over top of the mousse. More peanut butter mousse is then spread over the entire cake. After a quick chill, the entire cake is covered in chocolate ganache and sprinkled with more peanut butter cups.

Chocolate and Penut Butter Mousse 029-1

The peanut butter mousse in this cake is fabulous! Especially if you use a good quality natural peanut butter. It is smooth and creamy and perfect for eating with chocolate cake.

RECIPE:

Chocolate Peanut Butter Mousse Cake

Chocolate and Penut Butter Mousse 033-1

1 box chocolate cake mix (plus ingredients for preparing)
8 oz peanut butter cups; coarsely chop half of the chocolates

Peanut Butter Mousse:
8 oz cream cheese, at room temperature
1 cup creamy peanut butter
1 cup powdered sugar
1 cup heavy cream
1 tsp vanilla extract

Chocolate Ganache (recipe below)

Preheat oven to 350°F.

Prepare cake mix batter as directed on box (or use your favorite recipe). Stir the coarsely chopped peanut butter cups into the cake batter (reserve the second half of the peanut butter cups to garnish the top). Pour entire batter into one 10” round cake pan. (This is larger than a standard cake pan. If you want to use a standard sized pan, make 3-4 cupcakes out of the batter then pour the remaining batter into the pan. It will overflow if you use all of the batter in a standard pan). Bake cake for 40-45 minutes, or until center is set. Cool cake in pan for 10 minutes, then invert cake onto a wire rack to cool completely.

Prepare peanut butter mousse: In a large bowl, using an electric mixer, beat cream cheese and peanut butter until smooth. Slowly beat in powdered sugar. In a separate bowl, whip heavy cream and vanilla until stiff peaks form. Gently fold whipped cream into the peanut butter mixture.

Invert cake onto a serving platter. Leaving a 1-inch edge around the top of the cake, use a small, sharp knife to cut out the center of the center of the cake to create a cavity about 1-inch deep. (Don’t worry about removing it all in one piece) Use a spatula to spread about 1/3 of the mousse  into the hollowed-out center of the cake. Break the removed cake into pieces and return to the center of the cake, on top of the mousse. Mound cake pieces slightly at the center of the cake. Spread the remaining mousse over the top and sides of the entire cake. Refrigerate the cake until the mousse is firm, about 30 minutes.

Meanwhile, prepare ganache. Allow ganache to cool until thickened but still pourable. Carefully spread the ganache over the top and sides of the cake. Cut remaining peanut butter cups into 1/2” pieces. Scatter over the top of the cake while the ganache is still soft. Refrigerate cake for 1-2 hours before serving.

Chocolate Ganache Frosting

8 oz bittersweet or semisweet chocolate, chopped into small pieces
1 cup heavy cream
1 tsp vanilla extract

Place chopped chocolate  in a mixing bowl. In a saucepan, heat cream until it comes to a boil. Pour cream over chocolate in mixing bowl and stir until chocolate is melted and glossy.  Stir in vanilla.

For a glaze:
Cool ganache slightly (until thick enough that it won’t run off of the cake, but warm enough that it will still drizzle). Pour ganache over cake, starting in the center of the cake, allowing it to drip down the sides.

For a cake frosting, or for piping:
The longer you allow the ganache to cool, the thicker it will set.   For piping or for a regular cake frosting, allow the ganache to completely cool and set up at room temperature. Mix with a whisk slightly just before frosting the cake.

For a whipped filling or frosting:
For a thicker, fluffy frosting, or filling for a cake, chill the ganache in the refrigerator until slightly cold, then whip with a mixer until light and fluffy.

Recipe adapted from Chocolate Cakes

NoEmptyChairs.me

3 Comments

Filed under Desserts

Thanksgiving: Pumpkin Dinner Rolls

12-23-10 076-1

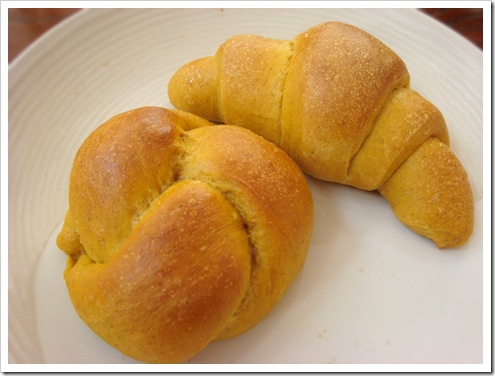
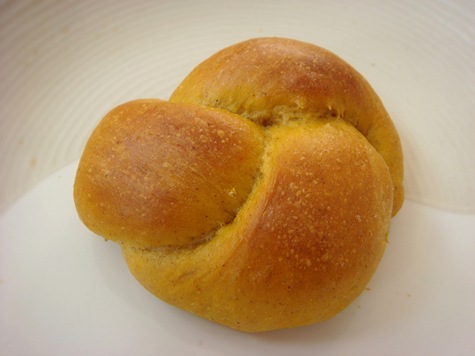
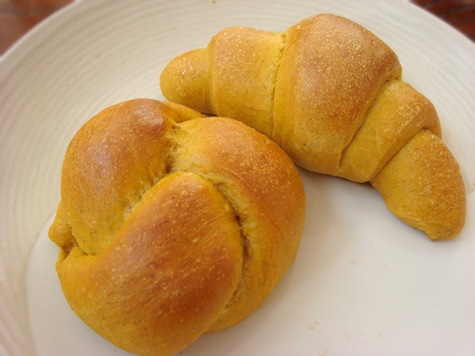
These pumpkin rolls have had a place at our Thanksgiving table for more than a dozen years now. They are a savory roll, not sweet. The pumpkin flavor is not strong, but the pumpkin and spices add a subtle flavor that goes perfectly with a Thanksgiving meal. When we are not eating them with Thanksgiving dinner, I like to serve them with honey butter (1 stick butter mixed with 1-2 Tbs honey).

112210 044-1

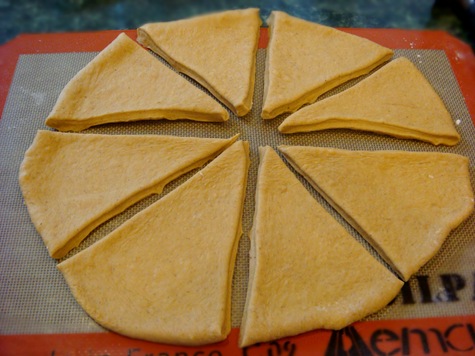
I usually make crescent shaped rolls and knots when I make dinner rolls. To make crescent rolls, divide the dough into thirds. Roll each third into a circle. Cut into 8 wedges. Roll up beginning with the large end. Pinch end into bottom dough of the roll so that it doesn’t unravel when rising. Place rolls on a greased baking sheet (or use a silicon baking sheet), curving ends toward the center as you place them on the baking sheet.

112210 035-1

Brush or spray dough crescents with oil, cover with a towel and let rise until doubled. For a shiny finish, brush rolls with an egg white wash (room temperature egg white mixed with 1 Tbs water) before baking.

12-23-10 072-1

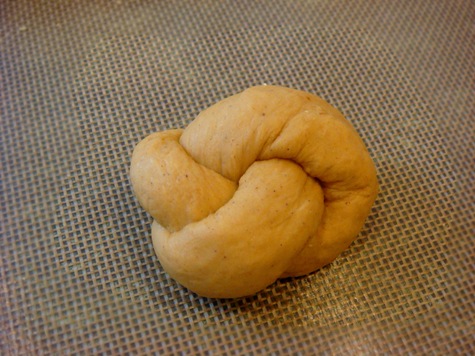
To make knots: pinch off a golf-ball sized piece of dough. Roll it in your hands to make a long rope (about 8-10 inches long). Tie rope in a knot (just like you are tying your shoes) leaving the two ends about 1-2 inches long. Fold two ends around to the back of the knot and pinch them together to seal. Place the knot on a baking sheet with the pinched ends on the bottom.

112210 043-1

When making rolls for Thanksgiving, I like to make them ahead of time and then reheat them just before serving. I parbake the rolls and then freeze them until I am ready to serve them. Parbaking (or slightly underbaking) keeps them from overbrowning when you reheat the rolls in the oven just before serving.

To make and freeze: Shape rolls and place on a large baking sheet lined with parchment paper or a silicon mat. Let rise as usual. Bake rolls for 10-12 minutes, or until rolls just barely begin to brown, but are cooked in the center. Rolls should look slightly underdone (not completely brown). Remove from oven. Cool completely. Place in Ziploc freezer bags. Freeze.

On serving day: Place frozen rolls on a baking sheet, bake for about 7-10 minutes, or until hot and golden brown. If rolls are thawed, bake for 5-6 minutes, or until browned. Brush tops with butter and serve immediately.

12-23-10 074-1

RECIPE:

Pumpkin Dinner Rolls

12-23-10 076-1

1 ¼ cups warm water
1 egg
1 cup pumpkin puree
3 Tbs honey
2 Tbs olive oil
1 Tbs molasses
4 cups whole wheat and/or white flour
1/3 cup wheat gluten
¼ cup sugar
2 tsp pumpkin pie spice ***
2 tsp salt
1  Tbs instant yeast

about 1 additional cup flour
1 egg white, mixed with 1 Tbs water
–

Mix wet ingredients in a large mixing bowl. Add flour, gluten, sugar, spices, salt, and yeast. Mix until thoroughly combined. Add additional flour, if needed, a little at a time until dough just begins to form a ball. Knead for 5-6 minutes, or until dough pulls away from sides of the bowl and springs back slightly when touched.

Shape into rolls (knots or crescents are what I usually make). Place on lightly greased baking sheets. Spray or brush with oil and cover with towel. Let rise for 30-60 minutes, or until doubled in size. Brush with egg white (room temp) mixed with 1 Tbs. water. Bake at 375°F for about 15 minutes.

***Pumpkin Pie Spice substitute: 1 tsp cinnamon, ¼ tsp nutmeg, and 1/8 tsp each allspice, ginger, and cloves.

–

If desired serve with Honey Butter: 1 stick butter mixed with 1-2 Tbs honey

–

To make and freeze: Shape rolls and place on a large baking sheet lined with parchment paper or a silicon mat. Let rise as usual. Bake rolls for 10-12 minutes, or until rolls just barely begin to brown, but are cooked in the center. Rolls should look slightly underdone (not completely brown). Remove from oven. Cool completely. Place in Ziploc freezer bags. Freeze.

On serving day: Place frozen rolls on a baking sheet, bake for about 7-10 minutes, or until hot and golden brown. If rolls are thawed, bake for 5-6 minutes, or until browned. Brush tops with butter and serve immediately.

Makes about 2 dozen rolls

NoEmptyChairs.me
1 Comment

Filed under Breads