Category Archives: Cookies

Twelve Days of Christmas Cookies: Chocolate Chip Cookies

DSC04233-2

DAY 3: Except I didn’t actually use chocolate chips. I used red and green Holiday Swirl chips in one batch and red and green dark chocolate M&M’s in a second batch. During non-holiday times, I would use chocolate chips (or my favorite Ghirardelli bittersweet chips).

I spent a long time trying to find the “perfect” chocolate chip cookie recipe. I know that will be different for everyone, depending on what you expect in sweetness, texture, chocolate density. This is my compilation of the best parts of several different recipes. Including an oatmeal cookie. The main differences between this and most chocolate chip cookie recipes: melted butter, and ground oats. The melted butter starts to melt the sugars (but not completely) giving the cookies a wonderful smooth texture. The ground oats help to give lift and keep the cookies soft. I am definitely NOT a crunchy cookie fan.

DSC04229-2

Chocolate Chip Cookies (Adapted for the holidays)

DSC04233-2

1 cup butter, melted
1 cup granulated sugar
1 cup firmly packed light brown sugar
2 large eggs
1 Tbs vanilla extract
2 cups all-purpose flour
1 teaspoon baking powder
1 teaspoon baking soda
½ teaspoon salt
2 ½ cups uncooked regular oats (or 2 cups oat flour)
1 ½ cups chocolate chips (or holiday chips, M&M’s)
1 cup chopped pecans or walnuts, optional

..

Preheat oven to 375°F.

Beat butter and sugars with a mixer. Add eggs and vanilla, beating well.

In a separate bowl, combine flour, baking powder, baking soda, and salt. Gradually add to butter mixture and beat well.

Process oats in a food processor until finely ground. Add to butter mixture and beat well. Stir in chocolate chips and nuts.

Drop cookies by tablespoonfuls onto ungreased baking sheets. Bake for 8-10 minutes or until lightly browned. Cool slightly on baking sheets. Then, remove to wire racks to cool completely.

Makes about 4 dozen cookies

NoEmptyChairs.me

.

TWELVE DAYS OF CHRISTMAS COOKIES RECAP:
DAY 1:
Swedish Peppar KaKar
DAY 2: Mint Oreo Cookies

Leave a comment

Filed under Cookies

Twelve Days of Christmas Cookies: Mint Oreo Cookies

DSC04255-2

DAY 2: These cookies are Big A’s favorite cookie to make. She almost always chooses to make these when she has to bring a treat somewhere. The cookie recipe is extremely simple, starting with a cake mix. The only time consuming part is putting the frosting between the two cookies (which really is not much to complain about). You can easily make these as plain oreos (instead of mint) by omitting the peppermint extract and green food coloring. Refrigerate these after making, as the filling contains cream cheese.

DSC04244-2

RECIPE:

Mint Oreo Cookies

  • Servings: about 3 dozen
  • Print

DSC04255-2

COOKIES:
2 chocolate cake mixes
4 eggs
2/3 cup oil

FILLING:
4 oz cream cheese
2 Tbs butter
1 tsp vanilla
¼ tsp peppermint extract
10 drops green food coloring
2 cups powdered sugar

COOKIES: Beat all cookie ingredients until well mixed. Roll into small balls and place on ungreased cookie sheets. Bake at 375°F for 8 minutes. Drop cookie sheet on counter to flatten cookies slightly. Cool cookies on rack.

Spread one cookie with filling. Top with a second cookie. Store in refrigerator.

FILLING: Beat cream cheese and butter with a mixer. Add vanilla, peppermint extract, and food coloring. Beat in powdered sugar.

NoEmptyChairs.me

.

TWELVE DAYS OF CHRISTMAS COOKIES RECAP:
DAY 1:
Swedish Peppar KaKar

For more wonderful Christmas cookie ideas, visit Food Blogga’s Eat Christmas Cookies Event. For submitting your own cookies to the event, visit Food Blogga.

3 Comments

Filed under Cookies

Twelve Days of Christmas Cookies: Swedish Peppar KaKar

DSC04393

DAY 1: Welcome to Twelve Days of Christmas Cookies. For the next twelve days, we will be baking Christmas cookies around here. This is one of my favorite Christmas traditions: baking with my children. It is fun to see them get excited about the traditional cookies that we always make every year. We also enjoy looking through cook books and online together to find a new recipe or two to try. And the best part is deciding on friends and neighbors to share them with! Today we start out with a family favorite.

These are not your average gingerbread cookies. They are so much better! The traditional gingerbread flavors are all there, but there is only a little bit of molasses, which gives them a nice mild flavor. Bake them for just a short time, and they are soft and wonderful. We love to use our tiny gingerbread man and angel cookie cutters for these. They are only about 1 ½-inches tall. Super cute! But be careful, they are very addictive. And when you can pop a whole cookie in your mouth in one shot, it is easy to talk yourself into “just one more”.

You could pipe an icing around the edges or to make faces, if you want, but they are great just on their own. We end up with enough other cookies filled or topped with frosting that it is nice to have a less sweet, but super flavorful “plain” cookie.

DSC04171 _DSC04189

My little gingerbread helpers!

DSC04383

DSC04198-2

RECIPE:

Swedish Peppar KaKar

  • Servings: Makes about 60 mini cookies
  • Print

DSC04393

(soft, mild Gingerbread cookies)

2 cups flour
1 tsp baking soda
1 ½ tsp ground ginger
1 tsp cinnamon
½ tsp ground cloves
½ tsp salt
½ cup butter
¾ cup sugar
1 egg, beaten
2 tsp molasses

Combine dry ingredients; set aside. Cream butter and sugar. Blend in egg and molasses. Add dry ingredients; mix well. Add a little bit more flour (up to ¼ cup), if necessary, to get a dough that is soft, but not sticky.

Chill dough for 1 hour. Roll and cut into small shapes (gingerbread men and/or angels).

Bake at 350°F for 6 to 8 minutes. Don’t overbake, or they will become crispy instead of soft.

Makes 60 mini gingerbread men

NoEmptyChairs.me

For more wonderful Christmas cookie ideas, visit Food Blogga’s Eat Christmas Cookies Event. For submitting your own cookies to the event, visit Food Blogga.

3 Comments

Filed under Cookies

Yummy Mummy Cookies

DSC02967

As Halloween approaches, the one thing my kids start asking for is “Mummy Cookies”. These are definitely the Halloween favorite at our house. I first found this recipe in a newspaper in northern Kentucky about 12 years ago. They were developed by Hershey’s Cocoa, and they still have a link to them on the Hershey’s website. I follow their recipe pretty closely, except that I do not add chocolate chips to the dough (I don’t think they were in the recipe 12 years ago). I like a smoother cookie, especially as these are coated in white chocolate.

DSC02958

The one problem that we have with these cookies in our house is, of course, that they are chocolate, and Little A will not let anything of that variety pass his lips. So I usually make two batches: one with the regular recipe, and one using a sugar cookie recipe as the mummy base. Little A’s okay with picking off those two little chocolate eyes. So we have both chocolate and vanilla mummies at our house. For a vanilla mummy, you can use any sugar cookie recipe that does not have a big spread. Here is my all time favorite Sugar Cookie Recipe.

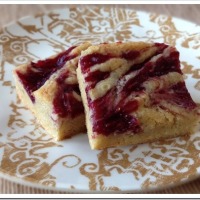
I do have to admit that I prefer my mummies naked. Shh-don’t tell! I’m not a real fan of white chocolate coating. Maybe if they were dipped in a good dark chocolate, but that would kind of ruin the mummy concept. Maybe if I shaped some like Bats?

DSC02720

As far as the cookie recipe goes, it is pretty standard: mix the wet ingredients, then add the dry ones. These cookies are always much better with little hands helping! Before making the cookies, you can refrigerate the dough a little, if you want, but I don’t usually find this necessary. The dough will store well in the fridge or freezer, however, so it is easy to make up a really big batch and then freeze some for another day.

To get your cookies to look like mummies, start with about a tablespoon of dough and make a wedged carrot-shaped body (about 3 inches long).

DSC02905___DSC02908

Place the body on a cookie sheet. Roll a small teaspoon-sized  ball of dough for the head (about the size of a grape). Again-this is a great job for little hands. Place the head on top of the body, pressing the two pieces together just a little. Bake and cool completely.

DSC02876

Melt your white chocolate chips with 1-2 Tbs of shortening (per bag) in a double boiler or in the microwave.

When the white chocolate is warm enough that it pours evenly from a spoon, you are ready to encase your mummies.

DSC02939

Place one cookie on the flat edge of a butter knife.

Be sure that the mummy’s head is supported, or it will soon be decapitated.

_

Hold the knife over the bowl of chocolate, and spoon the coating over the cookie. It should be quite runny (add additional shortening if necessary).

DSC02944

.

.

Gently tap the knife on the edge of the bowl to remove excess coating. Keep the knife straight, or you will end up with a mummy swimming in your chocolate.

.

Place the coated cookie on a waxed paper lined cookie sheet (use a toothpick to gently nudge the cookie off of the knife).

DSC02946

While the coating is still wet, add two mini chocolate chips for eyes. Let the white chocolate begin to harden (but not completely).

DSC02970

Use a toothpick to draw mummy “wrappings”. Let coating completely harden. If the room is warm, you may need to place the cookie sheet in the fridge for a few minutes.

Happy Haunting!

RECIPE:

Yummy Mummy Cookies

  • Servings: about 2 dozen
  • Print

DSC02963

2/3 cup butter
1 cup sugar
2 tsp vanilla
2 eggs
2 ½ cups flour
½ cup cocoa
¼ tsp baking soda
½ tsp salt
1-2 pkg white chocolate chips
1-2 Tbs shortening per package of chips (not butter)
Mini chocolate chips

Preheat oven to 350°F.

Beat butter, sugar, and vanilla until creamy. Beat in eggs. Stir together dry ingredients; gradually add to butter mixture. Beat until blended. Refrigerate 20 minutes for easier handling, if desired.

To form mummy bodies: Roll dough into 2-3” long carrot shape. Roll a small ball for a head. Press together on ungreased cookie sheet.

Bake 8-9 minutes. Cool completely.

Microwave white chocolate chips and shortening until smooth. Coat tops of mummy cookies by placing one cookie at a time on a table knife. Hold knife over the bowl of melted white chocolate and spoon mixture over cookie. Gently tap knife to remove excess chocolate. Place on waxed paper. Place 2 mini chocolate chips on for eyes. As coating begins to set on cookies, use a toothpick to score lines into the coating to resemble mummy wrappings.  Let harden completely before storing.

Adapted from Hershey’s

Makes about 2 dozen cookies

NoEmptyChairs.me

138 Comments

Filed under Cookies